

You've chosen a lovely floral motif, cut the background, and now you're staring at fusible web, freezer paper, and a pile of fabric wondering which method will keep the edges flat. Appliqué for quilting becomes much easier when you choose the technique according to the fabric, motif, and finished use before you cut anything.
Raw-edge fusible appliqué is quick and approachable, needle-turn creates a soft heirloom finish, and freezer paper helps you control tricky shapes. The right preparation matters just as much as the final stitch, especially if the quilt will be washed, densely quilted, or finished on a longarm.
What Appliqué Means in Quilting
Appliqué is the process of layering fabric pieces onto a background and sewing them in place to form a motif. A leaf, flower, house, or bird may be cut from one fabric and placed on another. That differs from pieced patchwork, where fabric shapes are sewn edge-to-edge to create a block.
The vocabulary can feel confusing at first:
- Motif: The fabric shape being added, such as a flower petal or bird.
- Background: The fabric underneath the motif.
- Foundation: The block or base that supports the design.
- Edge finish: The stitching or turned edge that keeps the appliqué secure.
A circle quilt pattern may use appliqué, piecing, or both, so it's useful to identify whether the shapes sit on top of a foundation or meet along sewn seams. This circle quilt pattern resource can help you see how curved forms behave in a larger quilt design.
Appliqué has deep historical roots. Early examples have been found in ancient Egypt, Asia, and Central Asia, and one museum source identifies appliqué on quilted items dating to the 9th century. Another source describes an Egyptian canopy quilt from 980 B.C. as the oldest surviving patchwork example. The technique became especially visible in the 18th and 19th centuries, when imported cotton chintz supported broderie perse and other cut-motif styles. In the United States, appliqué quilts rose to prominence between about 1840 and 1900, while the Baltimore Album quilt emerged in the 1840s as a highly detailed form. These dates and examples are documented in this history of appliqué.
Why method choice comes first
A delicate motif on a wall hanging has different needs from an appliquéd shirt quilt that will be handled and washed. Fabric weight, motif detail, background stability, and the desired texture all affect the best method.
- Use raw-edge fusible when speed and clear placement matter.
- Choose needle-turn when you want a soft edge with concealed raw fabric.
- Consider reverse appliqué or blanket-stitch work when the edge itself should add dimension and decoration.
The technique isn't just a finishing preference. It determines how you prepare templates, how much fabric you leave around a shape, and how the finished quilt feels in your hands.
Choosing the Right Appliqué Method
A good method match saves frustration at the cutting table. Raw-edge fusible appliqué is usually the fastest route for beginners and modern pictorial quilts. Needle-turn takes more patience but gives a flexible, traditional finish. Reverse appliqué removes the top layer around a design, while blanket stitch can make the edge a visible part of the artwork.
| Method | Prep Time | Stitch Visibility | Best Fabric | Skill Level |
|---|---|---|---|---|
| Raw-edge fusible | Short | Visible or subtle, depending on stitch | Quilting cotton and stable woven fabric | Beginner |
| Needle-turn | Longer | Nearly invisible with matching thread | Quilting cotton, sheers, and loosely woven fabric | Intermediate |
| Reverse or blanket stitch | Moderate to longer | Decorative and intentional | Wool, heavier woven fabric, and dimensional motifs | Intermediate to advanced |
Match the method to the project
Raw-edge fusible works well for blocky shapes, modern designs, and projects where you want to move from cutting to stitching quickly. A fusible web anchors the motif before edge stitching, but the adhesive can add stiffness. Test it first on a scrap if the background is lightweight or loosely woven.
Needle-turn suits traditional floral blocks, fine curves, and heirloom projects. The fabric edge turns under, so the finished shape feels softer. It also avoids the visible adhesive line that can appear through sheers or thin fabrics.
Reverse appliqué creates contrast by placing a fabric layer beneath the background, marking the motif, and cutting away the top layer inside the design. A blanket stitch can be worked by hand or machine when you want a clearly outlined edge. Thick wool and dimensional motifs often benefit from that visible treatment.
Broderie perse is another option for fabric art. It uses carefully cut printed motifs, often from chintz, and reflects the way imported fabrics influenced American quilt design during the 18th century, as described by Britannica's overview of American quilts.
Ask yourself three questions:
- Is the design made of fine curves and small details?
- Does the project need speed and repeatable placement?
- Should the finished surface feel soft, dimensional, or boldly outlined?
For a quick modern project, continue with fusible preparation. If your priority is a concealed edge and heirloom character, needle-turn deserves the extra time. The Fabric Company also publishes guidance on using fusible interfacing for appliqué, which is useful when you're comparing adhesive-based methods.
Raw-Edge Fusible Appliqué Step by Step
Raw-edge fusible appliqué starts with a simple idea. Adhesive holds the fabric shape in place, and stitching protects the edge. It's a practical choice for a pictorial quilt, a mug rug, or a first machine appliqué project.
Gather the right supplies
Set out the following before you begin:
- Lightweight fusible web: HeatnBond Lite or Sulky Tender Touch.
- Cutting tools: Sharp fabric scissors or a rotary cutter.
- Pressing protection: A Teflon pressing sheet.
- Template material: Template plastic or freezer paper for repeat shapes.
- Machine needle: A fine size 60/8 Microtex or 70/10 universal needle.
- Thread: Matching thread for a quiet edge, or invisible thread for a less noticeable outline.
The Fabric Company carries project supplies such as quilting cotton, premium thread, batting, scissors, rotary cutters, and sewing equipment. In the appliqué and quilting supplies collection, you can compare materials for the top, edge stitching, and eventual quilt assembly. Our Springfield, Tennessee showroom is another place to examine fabric weight and color in person.
Prepare and place the motif
Trace the reversed design onto the paper backing of the fusible web. Rough-cut around the traced shape, leaving enough surrounding material to handle without trimming the final edge yet.
Fuse the web to the wrong side of the motif fabric according to the manufacturer's directions. After the bond cools, cut the shape accurately. For a raw-edge finish, trim close to roughly 1/8 inch and clip inside curves so the edge can settle without pulling. The Steam-A-Seam 2 Lite appliqué guide offers another reference for working with lightweight fusible products.
Position each piece on the background. Press from the wrong side with a pressing sheet between the work and the iron to limit sticky buildup. Let the piece cool flat before moving it. The bond sets as it returns to room temperature, and cooling helps prevent shifting during stitching, as explained in this raw-edge appliqué guide.
Finish the edge
You have three common choices:
- Straight stitch: Use a short, steady line close to the edge for a clean modern look.
- Machine blanket stitch: Let the stitch cross the appliqué edge at regular intervals.
- Raw-edge satin stitch: Use a dense zigzag when you want the stitching to cover more of the fabric edge.
Test every setting on a scrap. A useful starting benchmark is a zigzag about 2.5–3.0 mm wide with a 1.5–1.6 mm length, or a narrow blanket stitch near 1.5 mm length and 2.5 mm width. The needle should swing just inside the appliqué edge on the left and just beyond the edge on the right. This locks the raw edge without leaving gaps or creating a tunnel.
Practical rule: Stop with the needle down at a sharp point, pivot, realign the fabric, and then continue. Don't force the fabric through a curve.
If the background is loosely woven, place tear-away stabilizer underneath before machine stitching. Remove it carefully after sewing so the background can relax without pulling away from the motif.
Needle-Turn Appliqué the Traditional Way
Needle-turn appliqué rewards a slower hand. You'll leave a small fabric allowance around the shape, turn that edge under as you sew, and use tiny stitches to attach the motif without making the thread the focus.
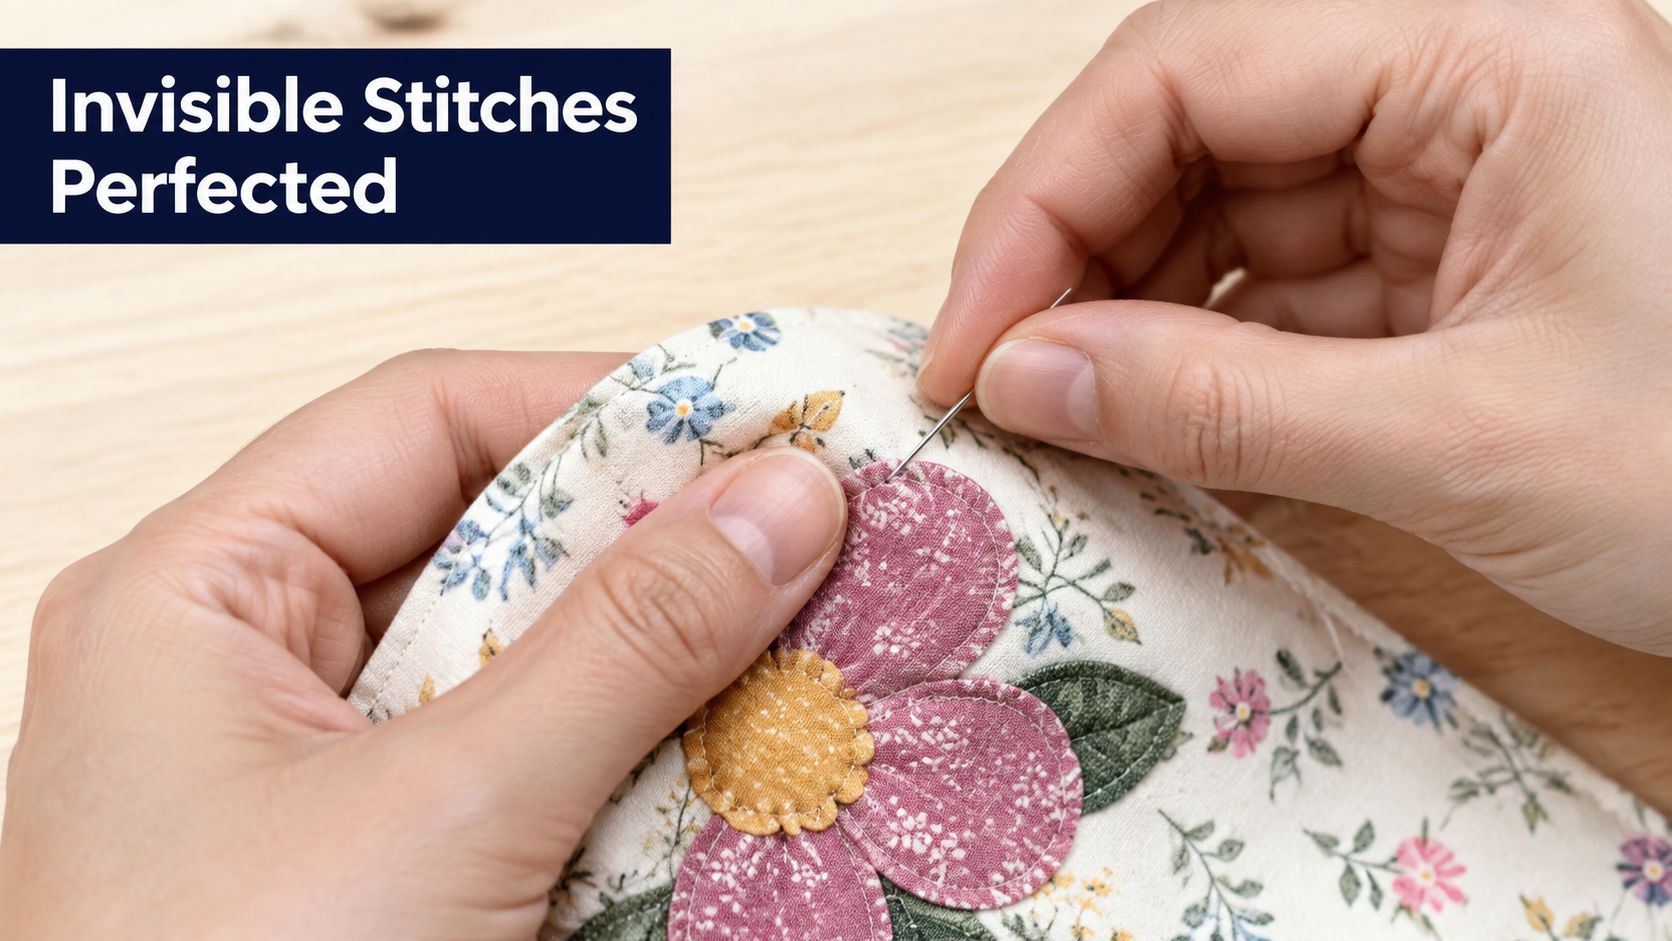
Trace the motif on the right side of the appliqué fabric, then cut around it with a 1/8 inch to 1/4 inch border. Prepare the template without a seam allowance. Pin or baste the shape to the background, keeping the drawn line visible as your turning guide.
Inside curves need relief. Clip almost to the drawn line, and snip diagonally toward inside corners without cutting through the line. These small cuts let the allowance spread when you turn it under. For a point, trim excess bulk while leaving enough fabric to cover the tip.
Make the stitches disappear
Use a sharp needle and fine thread that matches the appliqué fabric rather than the background. Slide the needle tip under the folded edge, then take tiny stitches that catch only one or two threads of the background. The goal is a blind stitch that holds the edge without creating a visible line.
A guide to needles for sewing can help you choose a sharp point suited to fine handwork. Keep your thread length manageable so it doesn't twist and knot as you work around curves.
The edge should turn smoothly, not fold into a hard ridge. If it resists, stop and clip the allowance more deeply before adding more stitches.
Use a stiletto, awl, or smooth chopstick to ease fabric around curves. Press small areas between turns rather than pressing the entire motif aggressively. Needle-turn takes longer than fusible appliqué, but the finished edge stays soft and works well with loosely woven fabrics that might become stiff or show adhesive.
The following video shows hand movement and stitch placement in a way that's easier to understand while your own needle is in your hand.
Freezer Paper Prep and Stabilizer Basics
Freezer paper gives you a temporary template that sticks to fabric when pressed. It's especially helpful for irregular shapes, sharp points, and repeated motifs because the paper keeps the outline crisp while you cut and fold.
Build a reusable template
Print or trace the pattern onto the dull side of freezer paper. Rough-cut around it first, leaving a margin that makes pressing easier. Place the shiny side against the wrong side of the fabric and press so the paper adheres temporarily.
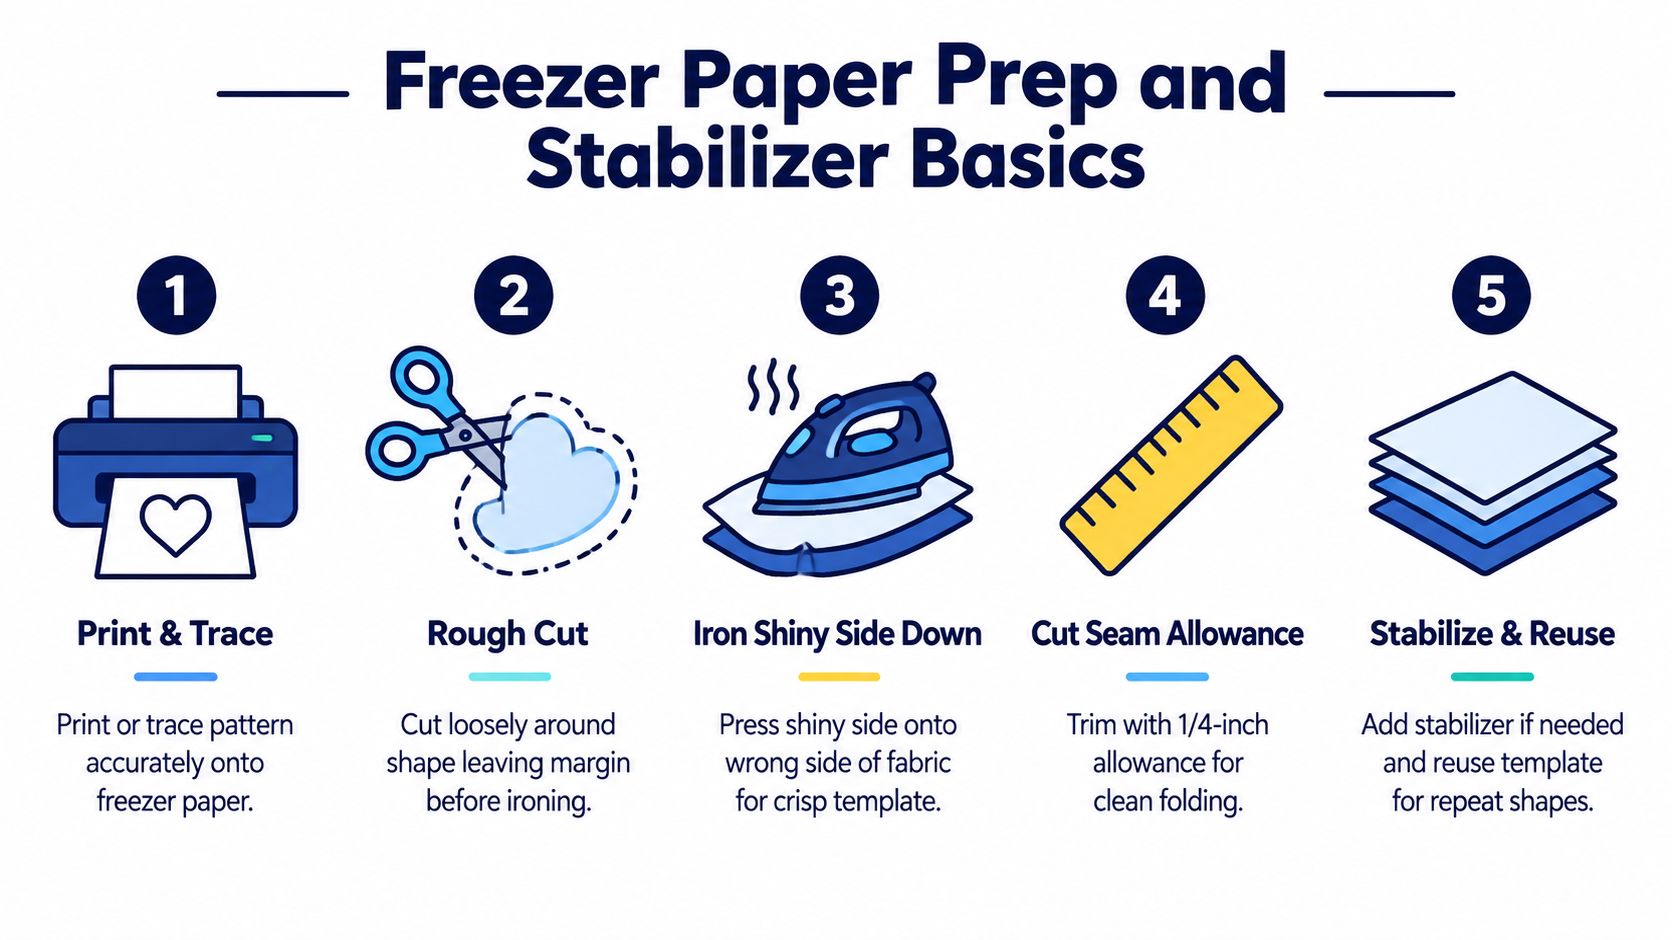
Cut on the drawn line, then peel the paper away if you're using the edge as a folding guide. For needle-turn, the crisp edge helps you turn the fabric consistently. For fusible appliqué, the template can guide placement or help you repeat the same shape across several blocks.
Choose a stable foundation
Quilting-weight cotton with a tight weave supports appliqué cleanly. Batiks tend to resist fraying because of their dense weave, but they may need a little more pressing time to accept a fusible bond. Always test the combination of fabric, adhesive, and iron before preparing the full set of motifs.
Stabilizer choice should follow the stitch and the finished use:
- Tear-away stabilizer: Useful beneath dense machine stitching.
- Wash-away stabilizer: Suitable for sheer or lace overlays.
- Lightweight cut-away stabilizer: Helpful for knits or projects that will be washed hard.
- No heavy interfacing: Preferable on wall quilts where excess stiffness would change the drape.
Freezer paper can also assist with fabrics that stretch or slip. Research on freezer paper reports improved speed and accuracy for irregular patterns, sharp points, small pieces, and unstable fabrics, as summarized in this freezer-paper appliqué study. For iron-on support, see the iron-on stabilizer options before choosing a product for your background.
Our Springfield, Tennessee showroom can be useful when you're deciding between a firm quilting cotton, a batik, or a fabric with more drape. Bring your pattern or a small swatch so you can compare the hand of the materials before cutting.
Finishing and Long-Term Care
The edge stitch is only one part of a durable appliqué quilt. Pressing, quilting density, batting choice, and washing all affect whether the motif stays smooth after the project leaves your sewing room.
Begin by pressing the completed top face-down on a thick towel. The pile cushions raised stitches and motifs, so you don't flatten them or create a shiny mark on the fabric. Let the top cool fully before adding batting and backing.
For the quilt sandwich, select batting according to the intended use. A needle-punched cotton batting with suitable loft can support a bed quilt without overpowering a delicate motif. If you're preparing a larger quilt, compare batting rolls and packages with your finished size in mind. A 108-inch backing can also reduce the need for a center seam on wide quilts, and 108-inch quilt backings are worth considering before you load the project.
Plan quilting around the design
| Approach | Effort Level | Best For |
|---|---|---|
| Stitch in the ditch around blocks or motifs | Lower | A quick frame and clear block definition |
| Echo quilt about 1/4 inch outside the motif | Moderate | Visible texture that emphasizes the silhouette |
| Background fill crossing near or over motifs | Higher | Modern texture and integrated surface design |
Stitching close to the appliqué edge, typically about 1/8 inch, helps secure the shape without building an oversized ridge. Some raw-edge methods use a line closer to 1/16 inch. Moderate stitch density is preferable to excessively tight stitching, which can cause puckering and distortion.
On a large motif, direct quilting can add useful structure. On small motifs, stitch in the ditch around the surrounding block may provide enough security. A longarm guide on quilting appliqué projects recommends stitching directly on pieces roughly 3 inches or larger, while allowing smaller shapes to be secured by nearby quilting. This approach keeps dense designs flatter and avoids outlining every tiny detail.
Wash and store with care
Wash a finished quilt in cold water on a gentle cycle with mild detergent. Air-dry it flat or tumble dry on low, removing it while slightly damp so it can finish drying without excessive heat.
Skip fabric softener on raw-edge projects. It can relax the stitching and change how the edge behaves. Store appliquéd quilts rolled rather than folded, especially when raised motifs or dense edge stitching could develop permanent creases.
Quick Projects and Troubleshooting
Start with a small project that lets you practice one variable at a time. A mug rug teaches placement and edge stitching without asking you to manage a full quilt top. A flower block builds hand-control, while a scenic mini quilt lets an experienced maker work with layered shapes and background quilting.
| Project | Skill Level | Technique | Finished Size | Est. Cost | Best For |
|---|---|---|---|---|---|
| Fusible mug rug | Beginner | Raw-edge fusible | 12-inch square | Under $10 in scraps | Testing machine stitches |
| Needle-turn flower block | Intermediate | Needle-turn | One quilt block | One fat quarter bundle | Practicing concealed edges |
| Raw-edge landscape mini quilt | Advanced | Raw-edge fusible | Mini quilt | Layered background plus motifs | Combining appliqué and quilting |
For the mug rug, cut one background square, add simple fused shapes, and practice straight stitch or machine blanket stitch around the perimeter. The flower block is a useful place to practice turning inside curves and corners. The mini quilt can include overlapping hills, trees, and sky shapes, with quilting lines added only where they support the design.
Fix the symptom you see
- Puckered edges: Too much adhesive or a pulled stitch may be drawing the fabric inward. Reduce fusible coverage, loosen your handling, and test a less dense stitch.
- Fraying raw edges: The stabilizer may not suit the background, or the edge may lack a securing stitch. Check the needle path and reinforce the perimeter.
- Edge lift after washing: The fusible bond may not have fully cured, or the edge stitch may have been skipped. Press, cool, and stitch a complete perimeter on the next test.
- Bulky inside corners: The seam allowance needs more clipping. Snip close to the drawn line, but don't cut through it.
Before you begin: Press the motif in place before stitching, then test the exact thread, needle, and stitch on a scrap using the same fabric layers.
If you're shopping locally, Our Springfield, Tennessee showroom offers quilting cotton, precuts, batting, thread, cutting tools, and equipment for appliqué projects. You can also browse precut collections, including Fat Quarters, Jelly Rolls, Charm Packs, Layer Cakes, 2.5-inch strips, and one-yard bundles, when you want coordinated fabrics without cutting every starting piece yourself.
Visit The Fabric Company to choose fabric, fusible supplies, batting, thread, and 108-inch backing for your next appliqué quilt. Shop our latest quilting fabric collection here, then join The Weekly Thread for more tips and 10% off your first order.