

What if the size printed on a panel listing isn't the size you'll sew? That's the gap that trips up many makers. Halloween fabric panels work best when you measure the usable printed image first, test the print for washing, then cut backing and batting larger than the top. Check fit before you buy coordinating fabric, and the rest gets much simpler.
What Halloween Fabric Panels Are and How They Are Sized
A Halloween fabric panel is a printed cotton piece with one large design and a blank border, meant to be used whole as a quilt center, wall hanging, pillow front, or table runner. You're not piecing the picture from small squares. The artwork is already there, so your job is measuring, framing, and finishing it well.
That sounds easy, and it can be. The confusion starts with size. A listing may describe the whole piece of fabric, while your project needs the printed scene inside the margins. Those two numbers aren't the same.
The Three-Measure Check
Before you cut, or even before you buy, record three separate numbers. The Quilt Kit guide to Halloween fabric panels separates the full edge-to-edge fabric size, the usable printed image, and the trim allowance needed to square the piece, with common widths of about 24, 36, or 44 inches and lengths often sold as 1, 1.5, or 2 yards.
Measurements to record for each Halloween fabric panel
| Measurement | What to Record | Typical Example |
|---|---|---|
| Full fabric size | Edge-to-edge width and length | 36 inches wide by 1 yard long |
| Usable printed image | Artwork area inside the blank margins | Smaller than the full fabric after margins are removed |
| Trim allowance | Extra cut needed to square the piece | Trim only what squaring needs |
| Common width | Width the panel is sold in | About 24, 36 or 44 inches |
| Common length | Yardage the panel is sold by | 1, 1.5 or 2 yards |
Blank margins may be included in the panel, but they may not belong to the motif you want to show. If a pumpkin face sits close to a margin, that margin isn't spare fabric. It's breathing room for your seam.
Panels are usually printed on quilting cotton, which is why the same piece can become seasonal décor or a simple apparel front. Don't let that flexibility rush you. Write all three numbers on a card and keep it with the panel. That card becomes your reference for borders, backing, and batting, and it stops you from adding coordinating prints to your cart based on the wrong size.
Practical rule: Buy for the usable image, not the edge-to-edge fabric.
Halloween Panel Designs and Where Each Works
Start by looking at the shape of the artwork, not just the characters in it. A tall scene suits a door or narrow wall, while a wide repeat suits a table. The photo below shows how different two panels can look before any borders are added.
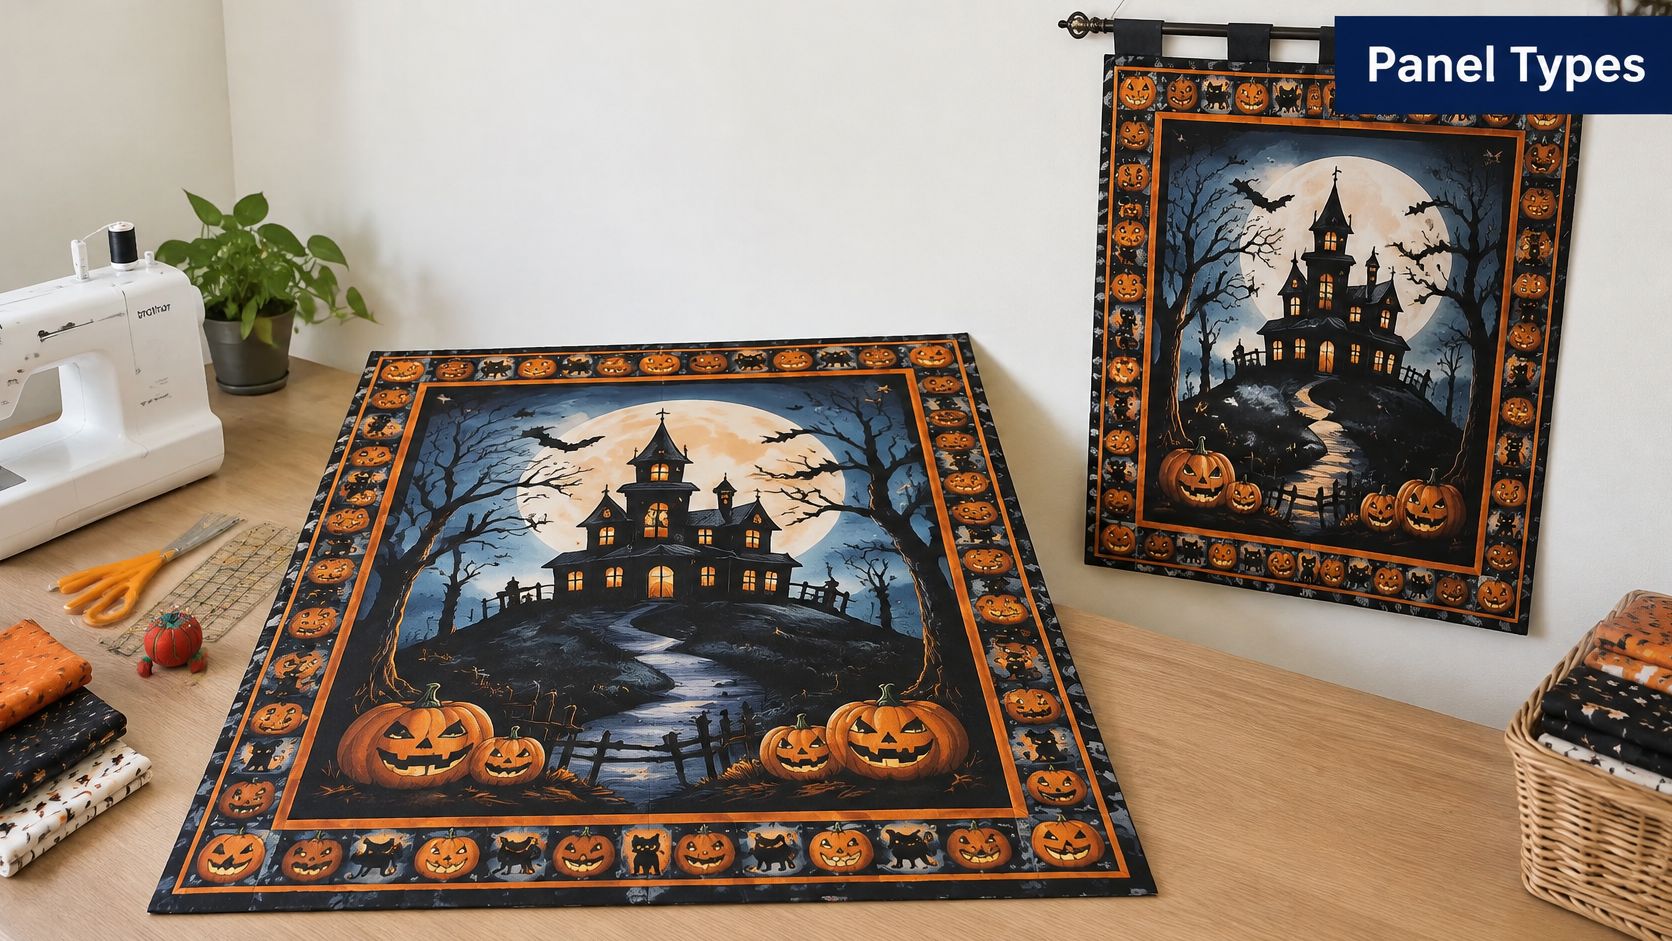
Use these Halloween fabric panels as a starting point, then match the format to the room or the person who'll receive it. If you're building a bundle around one panel, our Halloween quilt fabric bundles guide can help you pair it with calmer prints.
- Wall hanging with central scene: About 22 by 44 inches, intermediate. Best with a pieced or simple frame border that makes the scene look finished.
- Quilt center for a throw or pillow: Beginner to intermediate. Add a pieced border to reach the size you need without redesigning the middle.
- Table runner with repeated motifs: Beginner. A long panel may need little more than backing, light quilting, and a hem or binding.
- Banner and bunting sections: Beginner. Cut along printed divisions if they're provided, then fold and stitch each section over tape or twine.
- Tote or bag front: Intermediate. Choose a single strong motif and add lining plus stabilizer so the front holds its shape.
- Child-friendly apron or costume piece: Beginner. Pick friendly artwork and a print that holds up to washing, since this project won't just hang on a wall.
Halloween artwork often uses black, orange, and purple on light or dark grounds. Dark grounds can hide some stitch lines, while light grounds show every wobble. Neither is wrong, but you should test a stitch sample first with your planned thread.
Panels suit beginners and gift makers because the artwork does the design work. You choose the border, thread, and backing instead of matching several busy prints. The short video below is useful for seeing how a flat panel becomes a finished display piece.
Pick the design by placement first. A sweet print that's too wide for the table won't become right just because you love it.
Colorfastness, Prewashing and Reusing Panels
Many makers assume 100 percent cotton means a panel is fully washable. It doesn't settle the question. The fiber tells you what the base cloth is, but the ink system and your laundering routine decide how much color the print loses.
A 2025 Iowa State University study tested reactive- and pigment-ink cotton samples using AATCC methods for laundering, crocking, light, and perspiration. Pigment prints showed significantly less color loss than reactive prints during laundering, crocking, and perspiration, while light exposure produced little change in either group. For reusable wall hangings, runners, and quilt centers, that makes documented pigment-print or equivalent colorfastness testing worth looking for, especially for saturated black, orange, and purple motifs.
A Simple Test Before You Cut
Run this routine before measuring for borders. A panel that shrinks after piecing can't be fixed neatly.
- Prewash a swatch: Cut from a blank margin if you can, then wash it the way the finished item will be washed.
- Compare cold and warm water: Note which one releases more color, and use a color catcher if you have one.
- Press from the reverse side: This protects the printed surface while you check whether heat changes the color.
- Check for crocking: Rub a white cloth firmly over black, orange, and purple areas and look for transfer.
- Measure again: Record width and length after washing so shrinkage becomes part of your plan.
Our guide to preshrinking fabric walks through the washing step in more detail. Always check the manufacturer's care instructions first, since they should govern temperature and drying.
Then decide how the panel will live. A one-season wall hanging can tolerate gentle handling and storage away from direct sun. A tote, placemat, pillow front, or child's costume piece needs a stronger case for washability. Leftover margins and test pieces don't have to be wasted either. Ideas for hands-on crafting with old fabric scraps can turn those remnants into small decorations after the main project is done.
If it will be washed often, let the test swatch make the decision, not the fiber label.
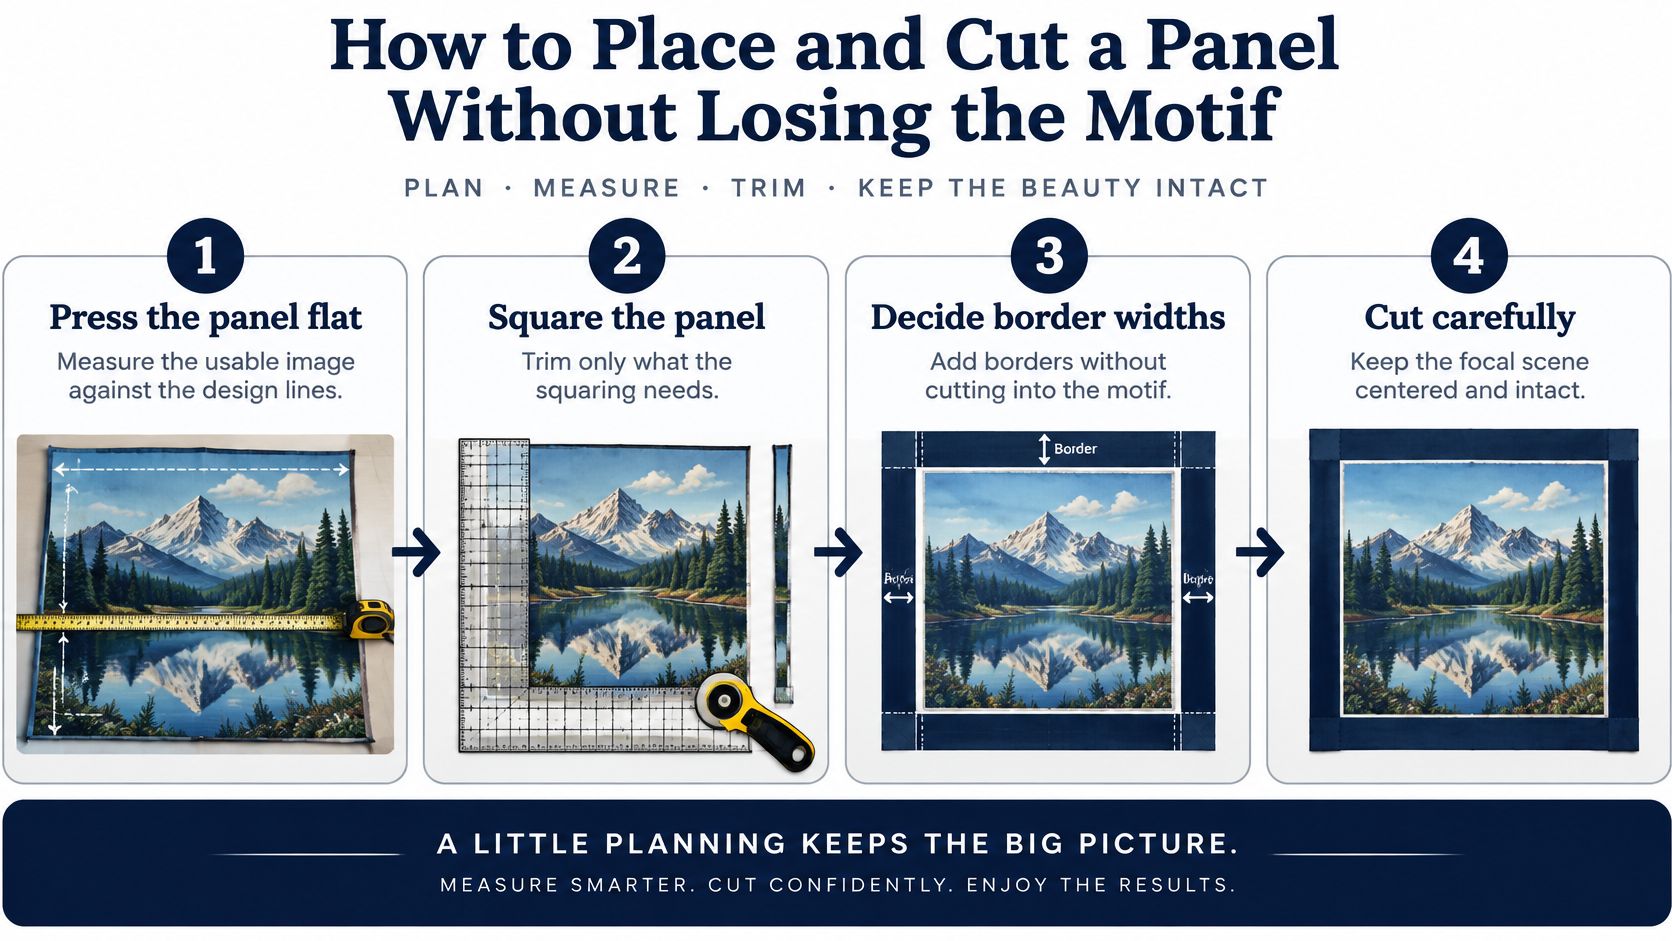
How to Place and Cut a Panel Without Losing the Motif
Will the panel still fit after squaring, seam allowances, and any prewashing? Check three measurements before you cut: the usable image, the panel's full width and length, and the amount you need to trim to square it. Compare those numbers with your project's finished size. If the remaining image is too small, adjust the border plan before buying or cutting fabric.
| Check | What to measure or allow |
|---|---|
| Usable image | Width and length of the printed area you want to keep |
| Squaring | Amount trimmed from each edge to make the panel rectangular |
| Seam allowance | Fabric that will sit inside each seam; keep important details this far from the cut edge |
Start with the printed design, not the fabric's raw edge. A printed line or border can reveal skew more clearly. Press the panel flat, then trim a little at a time: measure, cut, and measure again. A face, word, or pumpkin near the edge may leave less room for squaring than you expect.
Sketch border widths on paper before cutting strips from Precuts or yardage. Include seam allowances in the calculation, and keep faces and lettering safely inside the cut edge. The Utah State University Extension panel quilt guide recommends pinning at each border end and at the center, then easing fullness between pins without stretching the panel.
Sew with a 1/4-inch seam allowance and a moderate stitch length of about 12 stitches per inch, or roughly 2 mm. Adjust for your machine and test on a scrap first. If the edges do not match, pause and redistribute the fabric rather than forcing it under the presser foot. That helps prevent ripples.
After sewing, press the seams toward the borders and measure opposite sides again. Use a flat work surface for accurate rotary cuts; the cutting mat guide explains how to set up your mat.
Directional Prints Need One Extra Look
For bats, houses, or lettering with a clear top, mark the panel's top edge with a small pin before trimming. Check its orientation again before each border seam. A quick check can prevent a finished border from ending up at the wrong end.
Backing and Batting Sizes for Panel Projects
Cut backing and batting larger than the finished top. That extra perimeter gives you room for basting, quilting movement, and final trimming. If you cut all three layers exactly the same size at the start, one small shift during quilting can leave a raw edge short.
The American Quilter Halloween wall-hanging project uses a 22-by-44-inch printed panel as the front and cuts a 30-by-50-inch backing, leaving at least a couple of inches of backing and batting beyond each side of the panel for quilting. Use that same idea for larger tops. Add at least two inches per side, which means at least four inches to both width and length.
Backing and batting cut sizes for panel projects
| Project | Panel or Top Size | Backing Cut | Batting Cut |
|---|---|---|---|
| Wall hanging | 22 x 44 inches | 30 x 50 inches | Same as backing, 30 x 50 inches |
| Pillow front | 18 x 18 inches | 22 x 22 inches | 22 x 22 inches |
| Lap throw | 50 x 60 inches | 54 x 64 inches minimum | Same as backing |
| Queen quilt | 90 x 108 inches | 94 x 112 inches minimum | Same as backing |
| King quilt | 108 x 108 inches | 112 x 112 inches minimum | Same as backing |
Choosing the Backing
A 108-inch backing is the one-piece option for many lap and queen tops because it avoids a center seam across the back. That seam isn't a failure, but it adds bulk and one more line to keep straight. A king top is wider, so plan on two pieces joined by one seam and press that seam carefully before layering.
For the wall hanging and pillow rows, standard-width cotton may be enough. Still cut it oversized. You'll trim after quilting, when the layers have settled.
Choosing the Batting
Batting is sold as rolls, packages, or by the yard, in polyester, cotton, and blended options. Polyester often gives more loft, cotton gives a flatter drape, and blends sit between them. Cut batting to the backing size, not the panel size. A pillow front only needs a small square, so save roll remnants for those pieces.
Good batting choices aren't limited to quilts. The same ideas about loft and support apply when choosing batting for custom chairs, which can help you understand why thickness changes the finished feel. For standard package dimensions, check our quilting batting sizes guide before you order.
Sizing rule: Backing first, batting to match it, panel centered on top.
Brands such as Hobbs offer several lofts, so read the package for quilting distance. If your quilting lines will be far apart across a large panel scene, choose a batting that allows that spacing.
Stocking Panels, Backing and Batting Before October
Don't wait until the week you want to hang the finished piece. Seasonal prints move quickly, and a panel without its border fabric or backing becomes another unfinished project in the stash.
Buying Calendar
- Order panels by early September: This leaves time for delivery, prewashing, and a test swatch before you cut.
- Reorder coordinating fabrics early: Don't leave borders or binding until the last two weeks of October, when matching colors may be gone.
- Plan clearance buys after the season: A panel bought for next year is a bargain only if you store it with its measurements and care label.
Quantities for One Finished Project
- Panel: One panel per project, unless the design requires matching sections.
- Coordinating prints: A half yard of each print gives you room for borders and binding on small projects.
- Backing and batting: One set for every finished top, cut using your oversized measurements.
- Thread: One spool that works on both the darkest and lightest parts of the panel, tested on a scrap first.
For a gift-driven beginner, make it a one-trip list. Buy the panel, backing, batting, thread, and one Precuts & Kits bundle for borders and binding. Useful formats include 2.5-inch strips, 10-inch squares, Fat Quarters, and quilt kits. Our quilt backing yardage chart helps you confirm the backing amount before checkout.
If color matters most, shoppers can see panel prints in person at Our Springfield, Tennessee showroom before buying. That's especially helpful for dark Halloween grounds, where screen colors can look lighter than the fabric.
Store unused panels folded flat in a dry box, out of sunlight. Keep the care label and measurement card with each one. Next September, you'll thank yourself for not having to start the measuring all over again.
What You'll Need and Your Next Step
You're ready when the sizes work on paper and every layer is in the same cart. Use this list as your final check.
What You'll Need
- Fabrics: Your Halloween panel plus two or three coordinating prints, with at least one calmer blender so the main scene stays readable.
- Precuts & Kits: 2.5-inch strips, 10-inch squares, Fat Quarters, or a quilt kit to cover borders and binding without extra cutting decisions.
- Batting: A roll, package, or cut by the yard, sized to your backing rather than to the panel alone.
- 108-inch backing: A one-piece backing for lap and queen tops, or two pieces joined by one seam for a king top.
- Basic tools: Rotary cutter, mat, ruler, pins, thread, and a presser foot that helps you hold a steady 1/4-inch seam allowance.
Order the panel, backing, and batting in one cart so the sizes match. Then prewash, measure the usable image again, and only start trimming when both numbers still fit your project.
Shop our latest Fabrics collection here.
Join The Weekly Thread for more tips and 10% off your first order.
Start with one panel you love, record its three measurements, and pair it with the right backing, batting, and Precuts to finish it without a second shopping trip. Visit The Fabric Company to choose your panel and project supplies together, then make this the Halloween you finish before October arrives.