

A towel or bedsheet can hide a sewing machine, but it can't provide a reliable fit or protection level. The right sewing machine cover keeps dust, lint, pet hair, and moisture from settling around sensitive parts, while a padded cover or hard case adds protection when the machine travels or sits in a crowded space. Choose based on how your machine lives day to day, then make or buy the cover that matches that risk.
Why a Sewing Machine Cover Matters More Than You Think
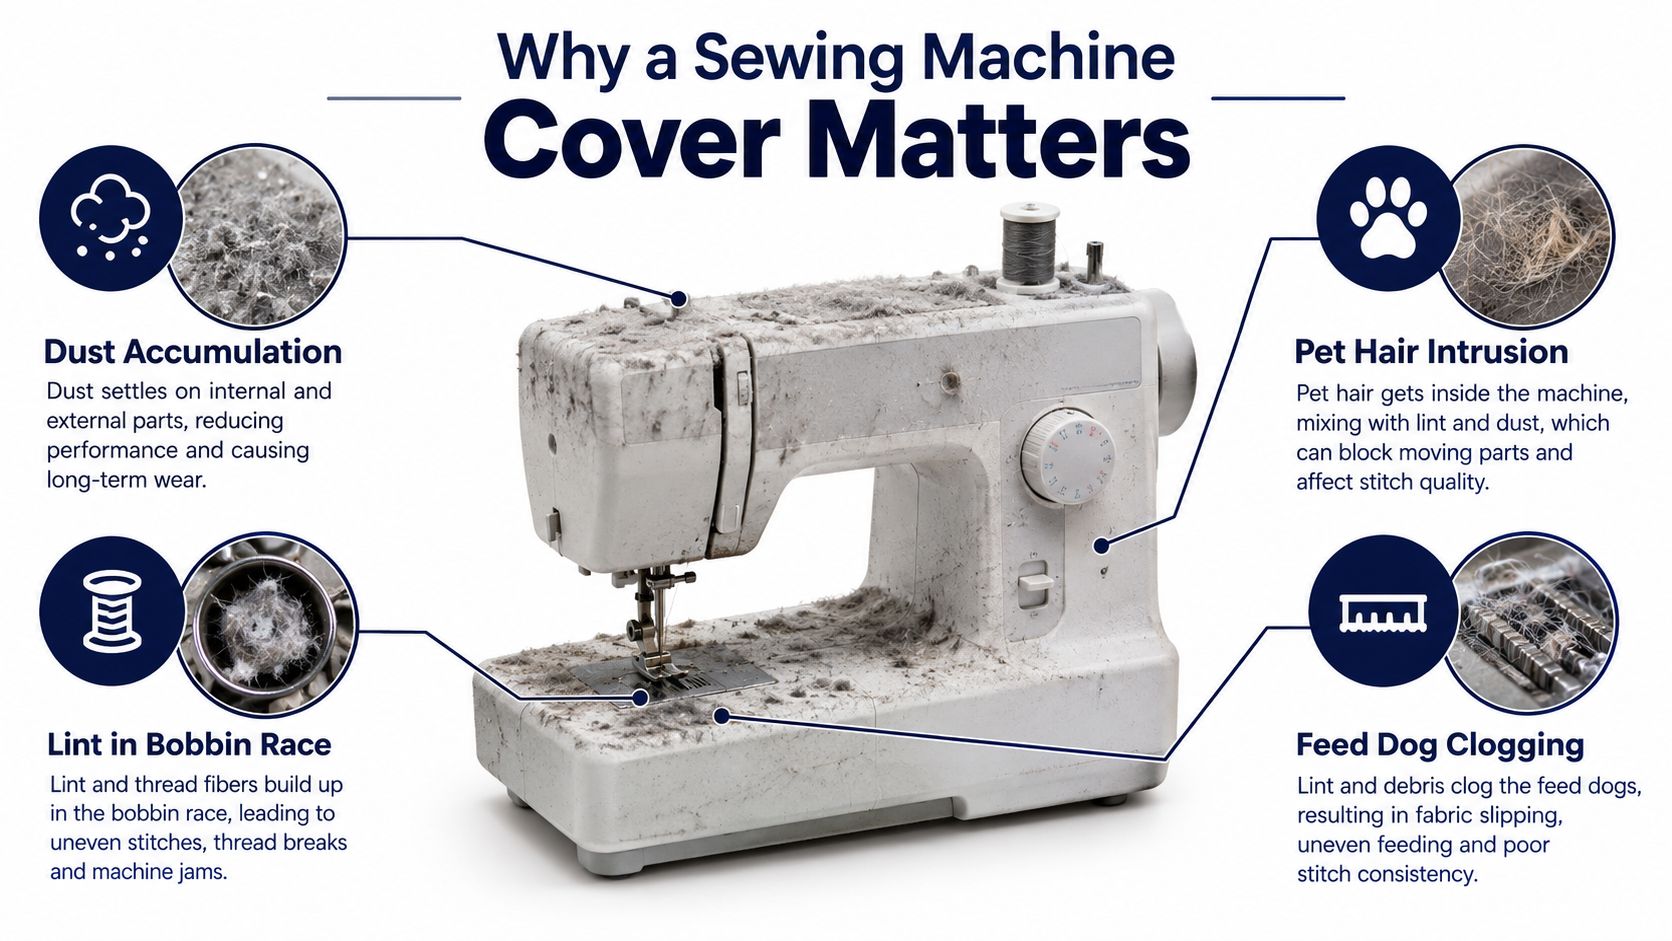
Pull back the towel draped over your machine and you may find a grey film across the bed, lint near the feed dogs, or pet hair around the bobbin area. A loose household cover can hide the problem without stopping it. Dust and debris settle into the spaces that need to stay clean, especially around the needle bar, tension area, bobbin race, and feed-dog opening.
A properly fitted sewing machine cover gives those areas a better barrier. It also keeps the machine ready for the next project instead of turning every sewing session into a cleaning session. The cover doesn't replace routine maintenance, but it reduces the material that reaches moving and exposed parts.
Practical rule: A cover should fit the machine closely enough to block debris, but not so tightly that it presses against controls, catches on the spool pin, or restricts airflow.
The cover's value becomes clearer when you consider where the machine sits. A machine in a closed closet faces a different risk from one on a dining table beside food preparation, a classroom table shared with other makers, or a car trunk on the way to a retreat. The right solution may be a breathable fabric slip, a quilted cover, or a hard-sided case.
The wider sewing-machine furniture and cover market is niche but globally distributed. A 2024 study estimated worldwide consumption at 170K tons, up 13% from the previous year, and projected 252K tons by 2030, with volume growth at a 6.8% compound annual growth rate. The same study reported an average global import price of $7,185 per ton in 2024, down 11.4% year over year, while per-capita consumption remained below 0.1 kg. These figures place covers within a small but measurable home-sewing ecosystem, not a passing decorating trend. (Global sewing-machine furniture market data)
For ideas about integrating a machine into a working room, see this guide to sewing machine cabinets for quilting. Our Springfield, Tennessee showroom is also a useful place to think through the relationship between the machine, table, cover, and storage area before you commit to a size.
A Quick Look at the Sewing Machine Cover Through History
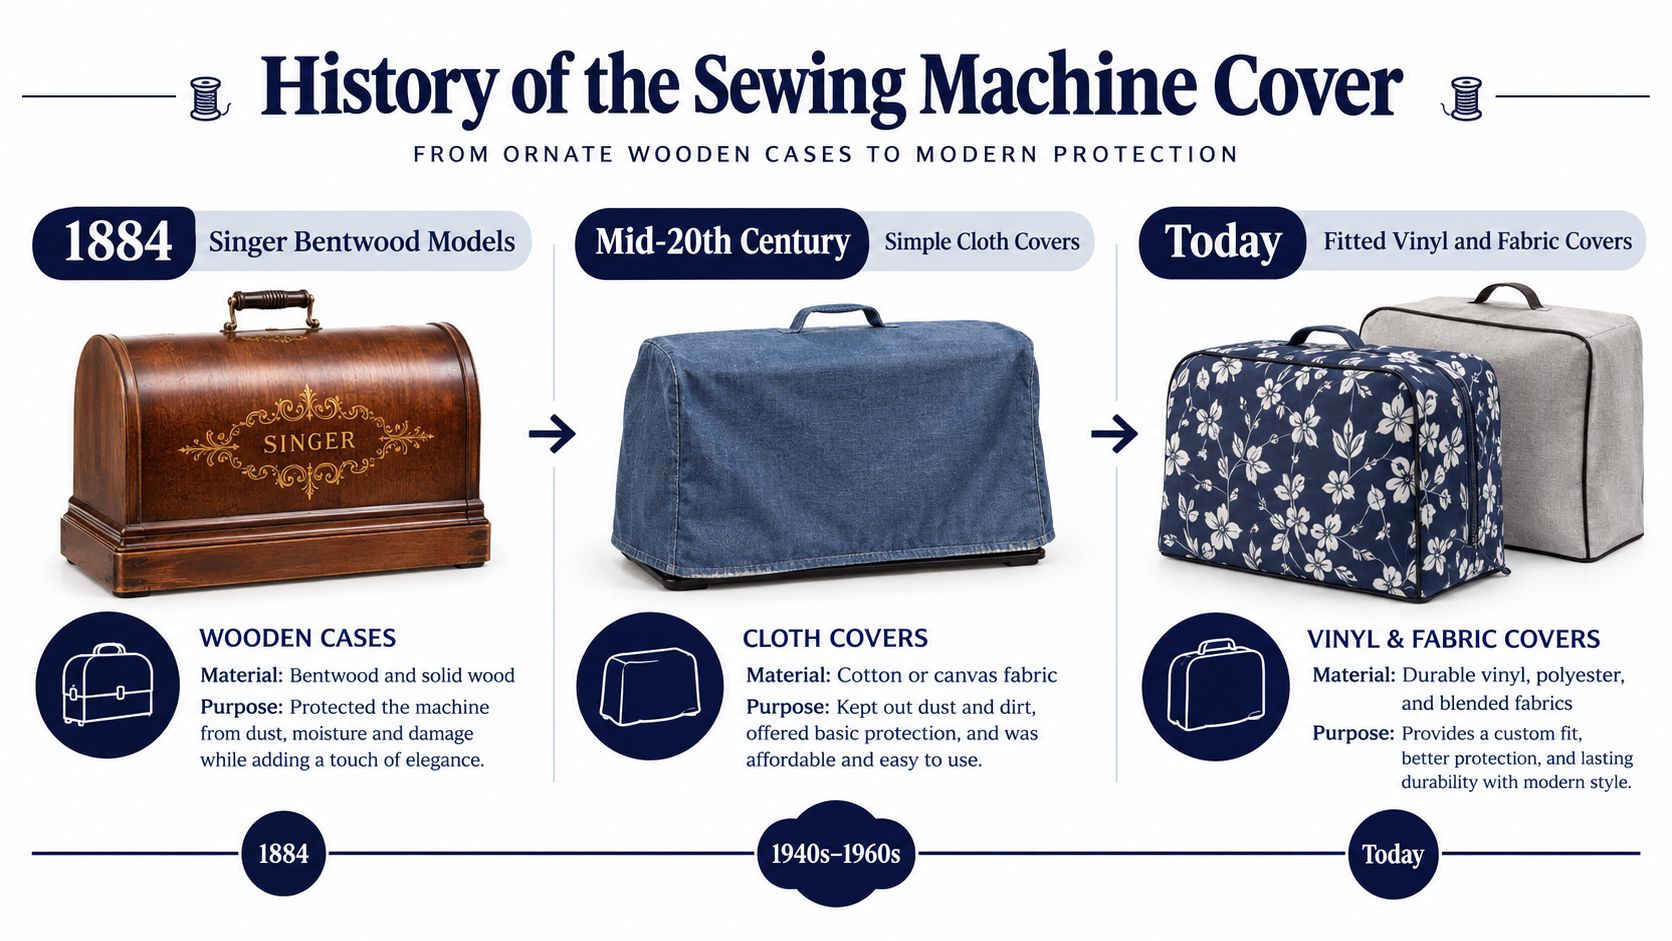
The sewing machine cover developed alongside the move from industrial sewing to household sewing. The broader home-sewing market was established by the 1850s, and Singer's first successful domestic machine in 1851 helped mark the beginning of large-scale household adoption. Once machines entered homes, owners needed a practical way to protect and store them.
Singer's introduction of a bentwood cover in 1884 is a useful turning point. Manufacturers made the curved form by steaming and bending inexpensive gumwood into a plywood-like shape. The result wasn't merely a lid. It helped present the sewing machine as a household furnishing, while also making a domestic machine easier to protect and move. (History of the bentwood sewing machine cover)
That history explains why a cover has always had two jobs. It protects the machine when it's idle, and it helps the machine fit the habits of the home. A wooden cover suited a substantial furniture-style setup. A portable machine needed something lighter and easier to handle. Today's sewist makes the same decision with different materials.
Modern options include breathable cotton covers, quilted padding, structured cases, and DIY designs made from quilting cotton. Some covers also use pockets for feet, scissors, manuals, or cords. The details change, but the question remains familiar: What protection does this machine need in the place where it rests?
A modern cover shouldn't be judged by appearance alone. Its value comes from the fit, the fabric, the airflow, and the conditions around the machine. That is why the prettiest cover isn't always the most useful one.
Dust Covers, Padded Covers, and Hard Cases Compared
The three main cover families solve different problems. A dust cover handles contamination from the room. A padded cover adds cushioning for everyday bumps. A hard case protects against compression, impact, and transport.
| Type | Protection Level | Weight | Best For | Trade-off |
|---|---|---|---|---|
| Breathable dust cover | Dust, lint, pet hair, and light surface contact | Light | Closets, shelves, and stationary home machines | Little protection from impact or compression |
| Padded cover | Dust plus light cushioning and surface protection | Moderate | Active studios and machines that stay on a table | Bulkier and slower to remove |
| Hard case | Impact, compression, and transport protection | Heavy | Classes, retreats, garages, basements, and crowded spaces | More storage space and less instant access |
A soft dust cover is the sensible choice for a machine that stays in one clean, dry room. Cotton percale, cotton twill, lightweight polyester blends, and canvas can block household lint while allowing air exchange. Soft covers are also easy to wash or replace, and they don't add much weight to a machine that you use every day.
A padded cover sits in the middle. Quilted nylon, cotton batting, and other padded constructions help guard against scratches, dirt, and light impact. A pocket can hold a foot, manual, or cord, but don't let storage features make the cover too loose. Extra fabric around the base can gather dust instead of blocking it.
A hard case earns its space when the machine travels or shares storage with other objects. Soft covers don't protect against impact or compression, while a hard-shell case is the dependable choice for travel, garage or basement storage, and crowded areas where something could fall onto the machine. For broader packing ideas, this guide to travel accessories for busy moms offers useful context about organizing items for movement.
Machine family matters as much as cover type. A vintage Singer 15, a Bernina 880, and a Janome serger don't share the same body shape, throat space, handle position, or accessory footprint. A fitted case for one may press against another's handwheel or leave the upper spool area exposed.
For a machine that travels regularly, compare a case with wheels and internal accessory storage, such as the PFAFF R-Luxe Roller Bag for admire air 7000. The goal isn't maximum protection in every situation. It's the lowest protection level that safely matches the machine's environment.
Sizing and Materials That Actually Fit Your Machine
A cover that fits the base but misses the raised spool pin isn't fitted protection. Measure the machine in its storage position, with the spool pin raised, the handwheel at its tallest point, and the handle included in the overall profile. Note the width, depth, and height, then allow enough ease for the cover to slide over the body without pulling at seams.
Measure the shape, not just the footprint
Start with a flexible tape measure, then confirm the measurements with a ruler where the body changes shape. Record:
- Height: Include the tallest pin, handle, thread path, or control.
- Width: Measure the widest part, not only the base.
- Depth: Include the handwheel and any rear extension.
- Attachments: Account for embroidery units, detached arms, wide throat plates, and removable accessories.
Off-the-shelf covers often assume a standard machine footprint. That assumption breaks down with embroidery units, long-arm setups, sergers, and machines with broad work areas. A cover that is slightly generous can be adjusted with a turned hem or side seam. A cover that is too small will pull at the corners and leave openings where dust can enter.
Select fabric for airflow
Quilting cotton works well when the cover is mainly for room dust and décor. Canvas and denim add structure, but their weight can make a large cover awkward to lift. Vinyl wipes clean, yet non-breathable plastic can trap evaporating moisture against metal parts and increase corrosion risk. Fleece-backed laminates can help in a dusty studio, but they still need careful handling where humidity is high.
| Material | Best Room/Setup | Breathability | Protection Level |
|---|---|---|---|
| Quilting cotton | Guest-room closet or clean sewing room | Good | Dust and lint |
| Cotton twill or percale | Daily-use home machine | Good | Dust, hair, and light abrasion |
| Canvas or denim | Active studio table | Moderate | More structure and surface protection |
| Vinyl or plastic | Short-term wipe-clean use | Low | Surface spills, but moisture can be trapped |
| Quilted cotton or nylon | Studio or storage shelf | Depends on lining | Dust plus light cushioning |
For humid storage, guidance commonly targets about 40–50% relative humidity and recommends using a desiccant only inside a sealed case, not beneath a breathable soft cover. A fitted, breathable cover is preferable to a plastic bag because plastic can trap moisture and create conditions for mold or rust. (Sewing machine storage guidance)
Before cutting, test the paper pattern or a temporary muslin around the machine. Check the foot pedal cord, handle, handwheel, and base. A few minutes spent on a test cover can save a finished piece that hangs like a bag or catches on every control. For broader machine-selection considerations, use this sewing machine buying guide.
A Simple DIY Sewing Machine Cover You Can Make This Weekend
A DIY cover works best when you treat it as a fitted shell, not a loose rectangle. A charm pack or fat quarter bundle gives you coordinated precuts for the exterior, while low-loft cotton batting adds light cushioning without making the cover stiff. Use a breathable lining, matching thread, clips, a rotary cutter, a ruler, a walking foot, and a pressing tool.
What You'll Need
- Exterior fabric: A charm pack, Fat Quarters, or quilting cotton from your stash.
- Batting: Low-loft cotton batting, preferably needle-punched cotton with modest loft.
- Lining: A breathable lining fabric that won't shed heavily.
- Tools: Rotary cutter, cutting mat, acrylic ruler, scissors, clips, marking tool, thread, and a walking foot.
- Finishing supplies: Binding fabric or enough allowance for a turned hem.
- Optional storage: A small side pocket for a manual, cord, or frequently used foot.
If you need batting for more than this project, compare batting packages and rolls with the loft and scrim that suit your quilting style. A batting roll is especially practical when you're also finishing a quilt and want a consistent material across projects.
Build the cover
- Measure the machine. Measure height, width, and depth at the widest points. Add comfortable ease so the cover can drop over the machine without binding around the handwheel or cord.
- Make a cutting diagram. Draw one top panel and four side panels on paper first. The top panel should follow the machine's footprint. The side panels should follow the actual taper of the body, rather than assuming a perfect box. Include a half-inch seam allowance if that is the seam size you normally sew.
- Cut the layers. Cut the exterior, lining, and low-loft batting. Keep the pieces labeled. If you use a charm pack, join the squares into a larger panel before cutting the top or front section. A Fat Quarter bundle offers more continuous fabric and may reduce piecing.
- Create the quilt sandwich. Place the batting between the outer layer and lining. Spray-baste or pin the layers, then quilt with simple diagonal lines. A pattern source recommends layered construction with batting between outer fabrics, and another describes quilting lines spaced about 1/2 inch apart. (DIY storage techniques and quilting guidance)
- Assemble slowly. Sew the side panels to the top, matching centers and corners. Clip the seam allowance around curves so the fabric can ease into place. If the corners won't sit square, check that the panel centers and seam lines are aligned before trimming anything.
- Finish the lower edge. Use a turned hem or a short binding strip. Stay-stitch the top edge before attaching the panels if the fabric stretches or the lining rolls. Press the seams toward the side panels, then test the cover on the machine before final topstitching.
- Add useful details. A back loop helps hang the cover when the machine is in use. A side pocket can hold a manual or cord, but skip pockets on the side that must sit tightly against a wall or cabinet.
A common beginner mistake is quilting the top panel too densely, then discovering that it puckers over the handwheel. Use a walking foot, keep the layers smooth, and let the cover's shape come from accurate panels rather than excessive stitching. A second mistake is making the opening convenient for a handle but leaving a large gap that invites dust. If you need a true transport solution, use a dedicated case instead.
For thread, notions, and beginner-friendly tools, browse sewing supplies for beginners. The Springfield, Tennessee showroom can also help you compare fabric hand, batting loft, and binding choices in person.
Caring for Your Cover So It Lasts for Years
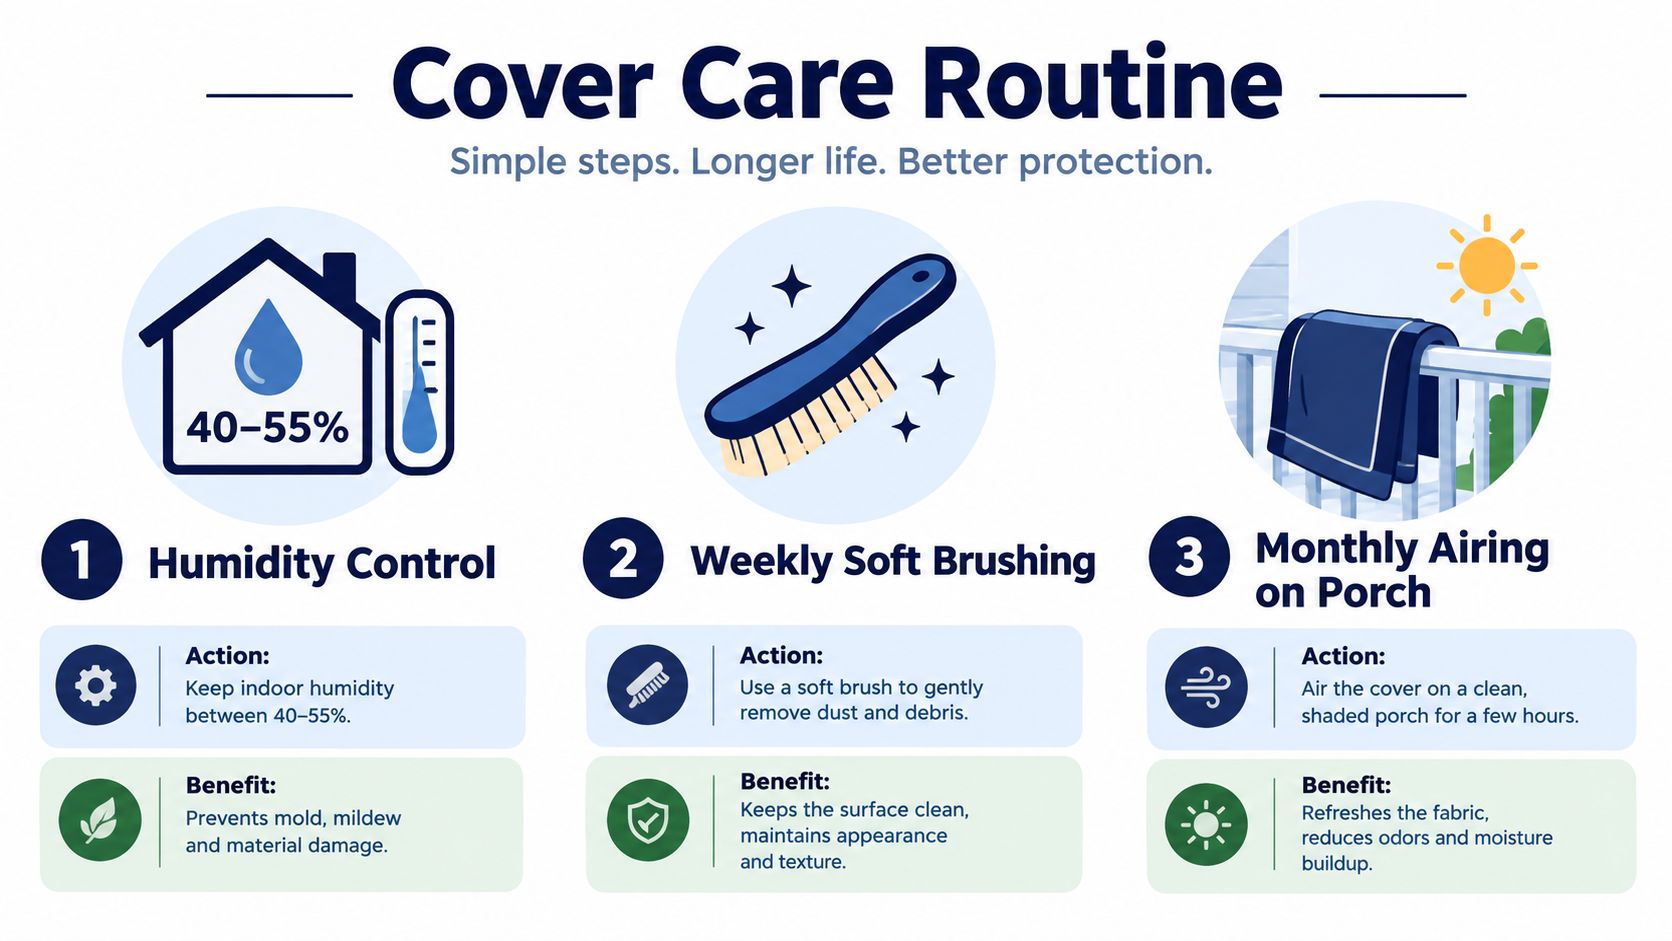
A cover protects the machine only when the cover itself stays clean and dry. Brush loose lint from the exterior with a soft lint brush, especially around the bottom edge and seams. If the cover has a pocket, empty it before cleaning so scissors, clips, or a metal foot don't damage the lining.
Use humidity and cleaning habits together
Storage guidance commonly places a suitable environment around 40–50% relative humidity. For a sealed case, a desiccant can help manage moisture, but it isn't a substitute for airing the machine and checking for condensation. A soft cover should breathe rather than seal the machine inside a damp pocket.
Wash a washable cotton cover according to its fabric and batting. Cold, delicate washing is a reasonable starting point, but test for colorfastness and check the care instructions for the batting. Spot-clean small marks with mild detergent and a soft cloth instead of washing the entire cover for every spill.
Vinyl and laminated covers should generally be wiped down. Repeated washing can stress seams, damage the coating, or open a pathway for moisture. Let any cover dry completely before it returns to the machine.
Watch the cover, not just the machine: A mildew odor, yellowing near the spool area, broken elastic, or frayed binding means dust and moisture may be getting through.
Air a fabric cover in a clean, dry place when it feels damp or develops an odor. Fold it along its quilting lines or store it loosely rolled, rather than crushing it under a stack of fabric. During long off-months, a small cedar sachet or silica packet inside the machine's bowl can support dry storage, provided it doesn't press against delicate parts.
For more general maintenance ideas, see More Sewing care tips for sewists. If you make a replacement cover from new quilting cotton, use the guidance on how to preshrink fabric before cutting, especially when the finished cover needs a dependable fit.
Choosing the Right Cover and Finishing Your Project
Choose the cover by how the machine lives, not by fabric alone. A machine stored in a closet usually needs a breathable dust cover that goes on quickly. A studio machine used daily benefits from quilted padding when rotary cutters, rulers, and unfinished projects share its table. A classroom or guild machine that travels between rooms, retreats, and vehicles needs a hard-sided case with reinforced protection and space for cords, feet, and manuals.
Check these four points before buying or sewing:
- Location: Is the machine in a clean room, humid storage area, or crowded shared space?
- Frequency: Will you remove the cover daily, or will the machine sit for weeks?
- Transport: Does it stay put, or travel regularly?
- Budget: Will a washable DIY cover control the main risk, or would a damaged machine cost more to replace?
The product categories at The Fabric Company include fabrics, precuts, batting, sewing tools, and equipment for a custom cover or practical sewing-room setup. Our Springfield, Tennessee showroom also lets you compare materials and plan around the machine's actual dimensions.
Use the cover you will reach for. A breathable slip protects a closet machine better than an elaborate case left on a shelf. A padded cover suits a studio, while weekly transport calls for a hard case. The right choice reduces dust, impact, and storage risk.