

Your scrap bin is full, the pieces are too good to discard, and none of them seem to belong together. That's exactly where a useful scrap-quilting system begins. Scrap quilting fabric can become a practical, beautiful quilt when you sort it by what it can do, then choose a pattern, construction method, and finish that suit the material.
Why Scrap Quilting Fabric Matters Today
A basket of remnants often looks like a problem. There may be faded florals beside crisp solids, narrow strips tangled with fat quarters, and clothing fabrics you've saved because they carry a memory. Yet quilters have always worked this way. The International Quilt Museum's history of American quilts describes a 400-year tradition shaped by trade, technology, and entrepreneurship, including old clothing, repurposed textiles, and very small fabric scraps.
During the Great Depression, newspapers and magazines encouraged households to make bedding from fabric already available. Patchwork wasn't just decorative. It reflected careful household management, practical creativity, and the refusal to waste a useful piece of cloth. In Gee's Bend, Alabama, women used fabric remnants to create abstract quilts during the nineteenth century, a regional tradition later recognized as an important American art form.
Your stash carries more than color
Mixed remnants can record clothing, household projects, changing tastes, and local identity. Leftover yardage, garment textiles, coordinated precuts, and offcuts can all serve a legitimate purpose, provided they're clean and stable enough for the project.
Scrap quilting also connects personal sewing habits with a larger waste problem. The U.S. Environmental Protection Agency's textile data estimates that 17 million tons of textiles entered the municipal solid-waste stream in 2018, representing 5.8% of total municipal solid-waste generation. Only 2.5 million tons were recycled, an overall textile recycling rate of 14.7%, while landfills received 11.3 million tons.
Quilting scraps are only a small part of that total, but reuse still matters. Turning remnants into blocks, appliqué, binding, utility quilts, or textile gifts keeps fabric useful before it reaches disposal.
Practical perspective: Scrap quilting isn't automatically sustainable. It becomes more responsible when you select usable material, avoid unnecessary processing, and finish projects you'll actually use.
For a stash that needs structure rather than another random project, review this guide to bulk quilting fabric for stash building. A thoughtful stash includes fabric you can identify, cut, wash, and combine with confidence.
Sorting Your Scrap Quilting Fabric by Usability
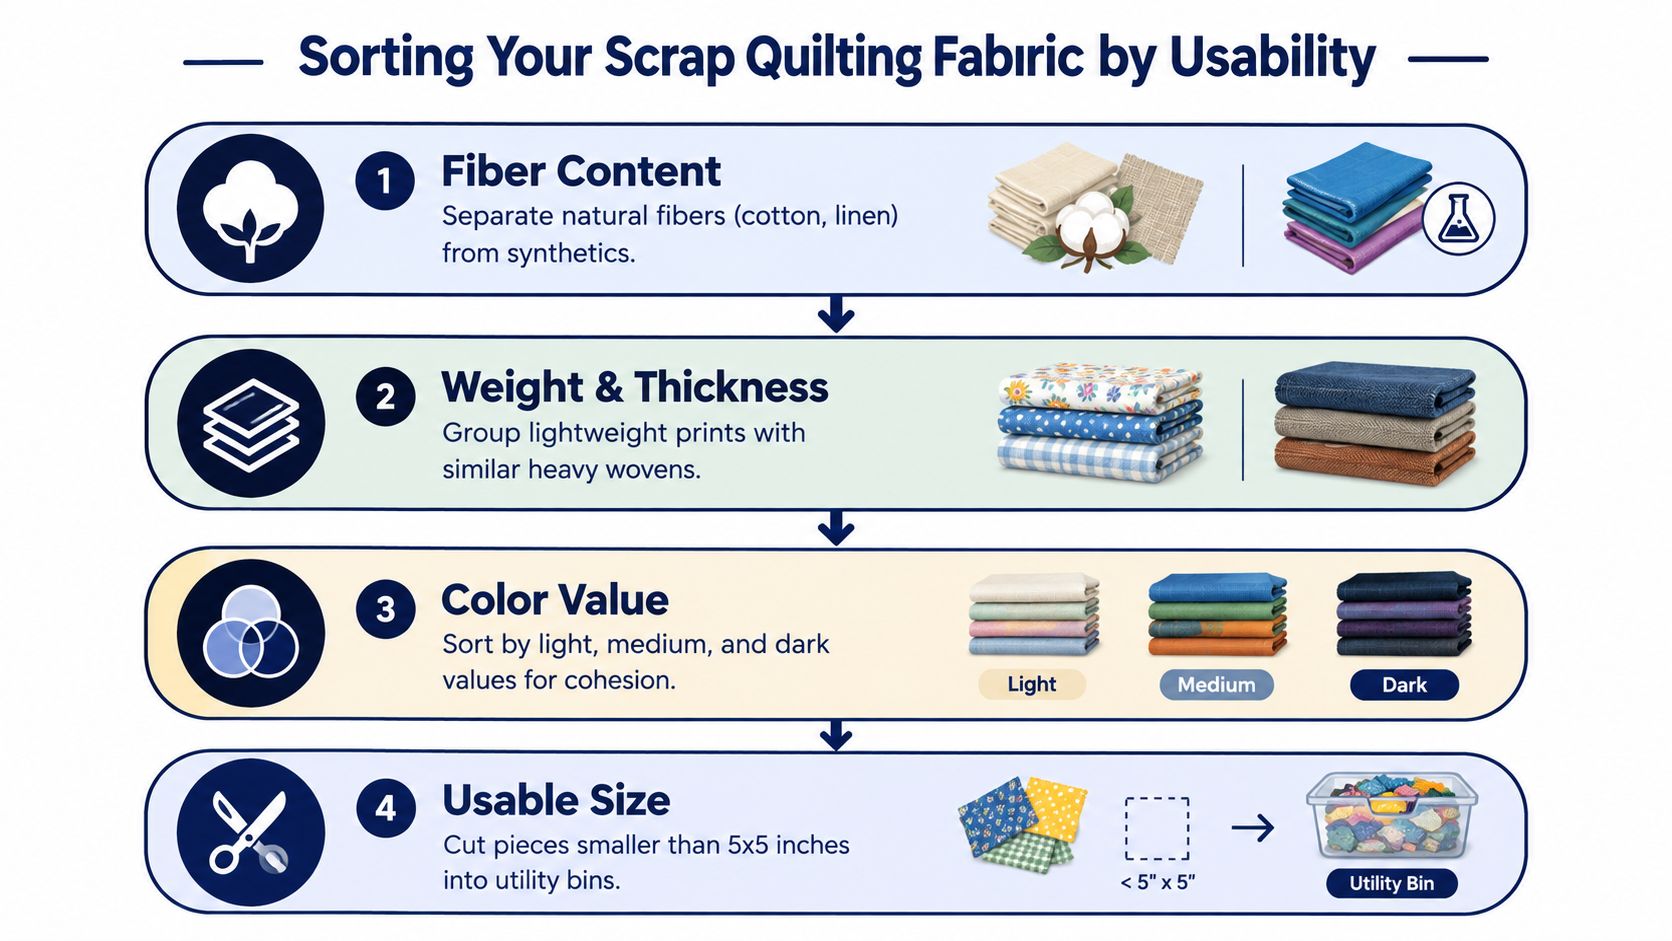
The fastest way to make a scrap pile harder to use is to treat every piece as interchangeable. Quilting cotton, flannel, denim, polyester, stretch fabric, and weakened clothing textiles behave differently under the needle. Sort before you design.
Use three practical sorting groups
Start with three containers or shelves. Don't worry about making the system perfect. It only needs to help you decide what happens next.
- Project-ready: Clean, stable cotton pieces with useful dimensions and no obvious dye-transfer risk. These can move directly into cutting or design.
- Needs testing: Unwashed fabric, uncertain fiber content, dark dyes, flannel, clothing textiles, or pieces with possible shrinkage. Set these aside for testing.
- Non-quiltable: Stained, brittle, badly weakened, oily, heavily contaminated, or unsuitable synthetic fragments. Consider stuffing, craft use, or an appropriate textile-collection route instead.
The last category is important. “Use every scrap” sounds virtuous, but laundering, stabilizing, piecing, and shipping unsuitable fragments can consume more resources than removing them from a quilt project. The European Environment Agency's 2025 textile-waste reporting states that 85% of household textile waste was not separately collected, which makes responsible sorting and disposal part of good stash management.
Prepare the pieces at the cutting mat
Press each scrap flat. Then square one reference edge with a rotary cutter, mat, and ruler. Use that established edge for later cuts instead of assuming the selvage, fold, or original garment seam is square. Iowa State University Extension explains that rotary cutting makes fabric-piece preparation easier and recommends keeping enough extra material to account for cutting errors in a fat quarter.
Work from largest to smallest:
- Cut the largest required pieces first.
- Reserve irregular remnants for smaller units, appliqué, or crumb quilting.
- Label piles by finished size.
- Keep similar weights together.
- Separate light, medium, and dark color values before deciding on a layout.
A small test prevents a large mistake. Cut representative pieces into identical strips, sew a short four-patch sample, and measure the finished unit. If it's more than 1/16 inch out of square, reject or recut the pieces before continuing, as recommended in Iowa State University Extension's quilting guide.
For fabric that needs washing or evaluation, use the fabric preshrinking guide before cutting a large batch. A little preparation is easier than correcting a quilt top that twists after laundering.
Planning Scrap-Friendly Quilt Patterns
A scrap-friendly pattern doesn't merely tolerate variety. It gives that variety a job. Choose the design by looking at the dominant shape, size, fiber, and color behavior in your stash.
A drawer full of fat quarters offers different possibilities from a basket of narrow strips. A collection of high-contrast solids can handle a structured block, while low-volume prints may need a strong background or repeated frame to prevent the quilt from looking muddy.
Match the pattern to the stash
Log Cabin blocks work well when you have strips in several lengths. Repeated rounds create order, even when the fabric colors vary. Sort strips by value first, then decide whether the center, light side, or dark side will follow a consistent placement.
Lone Star designs demand more control. They can use scraps, but the diamond arrangement benefits from fabrics with predictable grain, stable weight, and clear value contrast. Save this choice for a stash that contains enough compatible pieces.
Crazy Quilts welcome irregular shapes, decorative seams, embroidery, and fabrics that don't fit conventional units. They're especially useful for meaningful clothing textiles, provided the fabric is sound and colorfast.
Improv piecing gives you the most freedom, but it still needs visual decisions. Repeat a color, shape, background, or scale so the quilt feels intentional rather than accidental.
When your remnants are mostly 2.5-inch strips, strip piecing can produce a cohesive layout with efficient cutting. If you have fat quarters, a charm-pack-style arrangement can create manageable squares while preserving the identity of each print. Precuts such as Jelly Rolls, Charm Packs, and Layer Cakes can also anchor a busy scrap quilt. Robert Kaufman and Cloud9 offer coordinated collections that can supply a repeated color or value when your remnants lack enough visual connection.
Plan for the finished use
A donation quilt needs washable construction, dependable seams, and fabrics that behave similarly during laundering. Dense seams can add weight, and mixed fibers may shrink or wear differently. For a personal art quilt, you can accept more variation. For a child's quilt or charity project, stable cottons and a straightforward block usually make more sense.
A simple free Rail Fence quilt pattern can suit strips, fat quarters, and coordinated additions without demanding a complicated cutting plan.
Binding deserves planning before the quilt top is finished. Add twice the finished length to twice the finished width, then add 7 to 12 inches for joining strips and turning corners. Divide the result by 40 inches, the usable width assumed by Utah State University Extension, and round up.
For a 60-by-72-inch quilt, the perimeter is 264 inches. Adding 10 inches gives 274 inches. Dividing by 40 inches produces 6.85, so you need 7 strips, as shown in the Utah State University Extension binding formula. Check your scrap pile before cutting. Running out of binding at the end is avoidable.
Piecing Techniques for Mixed Scraps
The best piecing method depends on how reliable your scraps are. Precision patchwork needs stable dimensions. Improv piecing needs fabric that can tolerate trimming. Crumb quilting needs many small pieces and a willingness to let the surface develop gradually.
Traditional patchwork rewards control
Use traditional patchwork when your scraps contain enough fabric for identical squares, rectangles, or strips. Cut several representative pieces first, then sew a test unit. This reveals whether the fabrics stretch, shift, or create bulky intersections before you commit the whole pile.
Keep seam allowances consistent. A lightweight quilting cotton beside a thick woven can pull a unit out of shape, especially when the heavier fabric resists pressing. Press according to the block design, and avoid forcing a distorted seam flat with excessive heat.
The piecing a quilt guide is useful when you want a controlled workflow from cut pieces to joined blocks.
Improv piecing gives you a different kind of control. You may not control the exact finished shape, but you can control value, scale, and repetition. Place a few units on a design wall before sewing a long chain. Look for areas where all the dark fabrics collect or where several large prints compete.
Color value usually matters more than exact hue. A repeated light background can calm jewel tones. A narrow black, navy, or neutral strip can separate prints that otherwise blend together. Repeating a shape, frame, or accent fabric creates rhythm without making every block identical.
Cutting-mat rule: Let irregular scraps create interest, but give them a stable neighbor. A straight-edged background or repeated strip keeps the finished block from wandering.
Crumb quilting handles the smallest usable pieces. Sew tiny scraps into small units, press the seams open or to one side according to the bulk, then trim those units into workable shapes. Don't use stained, weak, or unstable fragments just because they're small. A tiny piece still has to survive handling, pressing, quilting, and washing.
Here's a useful comparison:
| Method | Best for | Main risk |
|---|---|---|
| Traditional patchwork | Stable scraps with repeatable dimensions | Small cutting errors spread through the quilt |
| Improv piecing | Mixed shapes and expressive layouts | The top can lose balance without value planning |
| Crumb quilting | Very small cotton remnants | Bulky seams and excessive handling |
Before choosing batting or backing, decide whether the top will become a wall piece, lap quilt, bed quilt, or donation quilt. The end use determines how much seam density and weight the finished project can carry.
A hands-on review can also prevent an expensive wrong turn. The Fabric Company's Springfield, Tennessee showroom gives local quilters a place to compare fabric weights, batting loft, rotary tools, and backing options before beginning a demanding scrap project.
Finishing Your Scrap Quilt Project
A scrap quilt becomes useful through its finish. Pressing, trimming, quilting, batting, backing, and binding all affect whether the final piece lies flat and survives regular use.
Begin by trimming the quilt top after the last pressing. Check the corners and edges for fullness rather than stretching them into place. Bulky intersections may need careful pressing, a flatter seam arrangement, or slightly lighter quilting in that area.
Choose batting and backing with the end use in mind
Batting changes the quilt's loft, warmth, weight, and drape. Hobbs batting is one option to compare in packages or rolls, but the right loft depends on whether you want a flexible everyday quilt or a thicker, warmer layer. Needle-punched cotton, scrim, and fiber content all affect how the quilt handles during quilting and washing.
A 108-inch quilt backing can simplify larger quilts by reducing or eliminating a center seam. It also saves time during layout and can make longarm preparation easier. For smaller quilts, larger remnants can become a pieced backing, especially when the reverse side is part of the design rather than an afterthought.
Use the binding finishing guide when you're ready to attach the final edge. Binding strips are commonly cut 2.25 inches wide for a thinner quilt sandwich and 2.5 inches wide when the batting is thicker. Match the width to the loft and the amount of bulk at the edge.
Make the final assembly manageable
A clean finish usually follows this order:
- Press the top: Remove seam ripples before layering.
- Prepare the backing: Square it and allow enough margin for quilting.
- Layer the sandwich: Place backing, batting, and quilt top without stretching.
- Quilt deliberately: Use stitching that supports the block structure and doesn't overload dense seam areas.
- Trim after quilting: Let the quilt settle before cutting the edges straight.
- Attach binding: Join strips securely and turn the corners with even tension.
- Wash carefully: Follow the fiber and batting requirements rather than assuming every scrap behaves like cotton.
Mixed-fiber quilts deserve special caution. Cotton, denim, synthetics, flannel, and stretch fabrics can respond differently to water, heat, and quilting tension. That's one reason scrap triage matters at the beginning. Material selection affects not only appearance, but also durability, laundering, and comfort.
The circular value of this work extends beyond a single quilt. A case study of Safina Quilt's textile reuse in Balikpapan documents fabric scraps and discarded clothing becoming bags, pouches, decorative pillows, and tablecloths through quilting techniques. The important lesson is practical: sorted remnants can become useful products rather than just being stored as waste.
Build a finishable project system
Keep a small finishing kit with fresh needles, quality thread, rotary blades, spare binding clips, and a reliable iron. A dull blade can distort cuts, while poor pressing can create problems that look like inaccurate sewing. If you make quilts for charity or guild exchanges, record the fabric types and washing instructions so the recipient gets useful care information.
The What You'll Need list for a scrap quilt may include:
- Precuts: Fat Quarters, Jelly Rolls, Charm Packs, Layer Cakes, or 2.5-inch strip rolls to add structure.
- Batting: Hobbs batting in a package or roll, selected by loft and intended use.
- Backing: 108-inch quilt backing for larger projects or wide remnants for a pieced reverse.
- Tools: Rotary cutters, rulers, mats, scissors, thread, clips, and pressing equipment.
- Machine support: A dependable SINGER or PFAFF machine when your project requires consistent piecing and quilting.
Finished quilts can go to a household, a guild exchange, or a charity drive. Scrap quilting starts with resourcefulness, but it ends with service when the finished textile provides warmth, comfort, decoration, or a useful daily layer.
The Fabric Company carries precuts, batting, 108-inch quilt backings, thread, tools, and project supplies for turning sorted remnants into finished quilts, with online shopping and the Springfield, Tennessee showroom available for hands-on help. Visit The Fabric Company to choose the materials your stash is missing, then join The Weekly Thread for more tips and 10% off your first order.