

You've cut a stack of half-square triangles, but the edges keep shifting under the ruler and the points look less crisp after pressing. Quilting spray starch can help, but it isn't a required finishing step for every quilt. Used selectively, it becomes a precision tool that adds temporary body, steadies fabric, and makes difficult pieces easier to cut and sew.
The best results come from matching the treatment to the fabric format, project type, and amount of control you need. Starch yardage before cutting when accuracy matters, use a lighter touch with precuts, and skip it when a soft drape matters more than a firm hand.
When Quilters Actually Reach for Spray Starch
Spray starch earns its place when fabric is moving more than your pattern allows. Bias strips, diamonds, appliqué shapes, and small pieced units can twist or stretch while you cut and sew. A light starch treatment gives those pieces more body, so the weave stays closer to the shape you created with the ruler and iron.
Yardage is often the easiest format to starch well. A full piece can relax, receive an even application, and be pressed before you cut it into strips or units. This is especially useful for geometric quilts with repeated points, matching seams, or many half-square triangles. Quilters commonly use starch before cutting because it helps the grain stay more stable and makes seams easier to match, as explained in this beginner's guide to quilting supplies.
Choose control over habit
Ask what the project needs before you reach for the can.
- Use starch for precision: Try it with bias-cut pieces, miniature blocks, repeated points, or fabric that feels soft and difficult to control.
- Test fat quarters first: A fat quarter may benefit from starch when it contains many matching shapes, but loosely woven fabrics, batiks, and some precuts can respond differently.
- Skip it for simple patchwork: Borders, large rectangles, and ordinary piecing may be faster to press without adding another preparation step.
- Leave templates to do their job: Foundation paper, templates, and construction methods that already stabilize the fabric may not need temporary stiffness.
The decision is practical. If starch improves cutting accuracy enough to prevent rework, it may save time and fabric. If it only makes an easy project feel stiff, it's an unnecessary expense.
What Spray Starch Does to Fabric
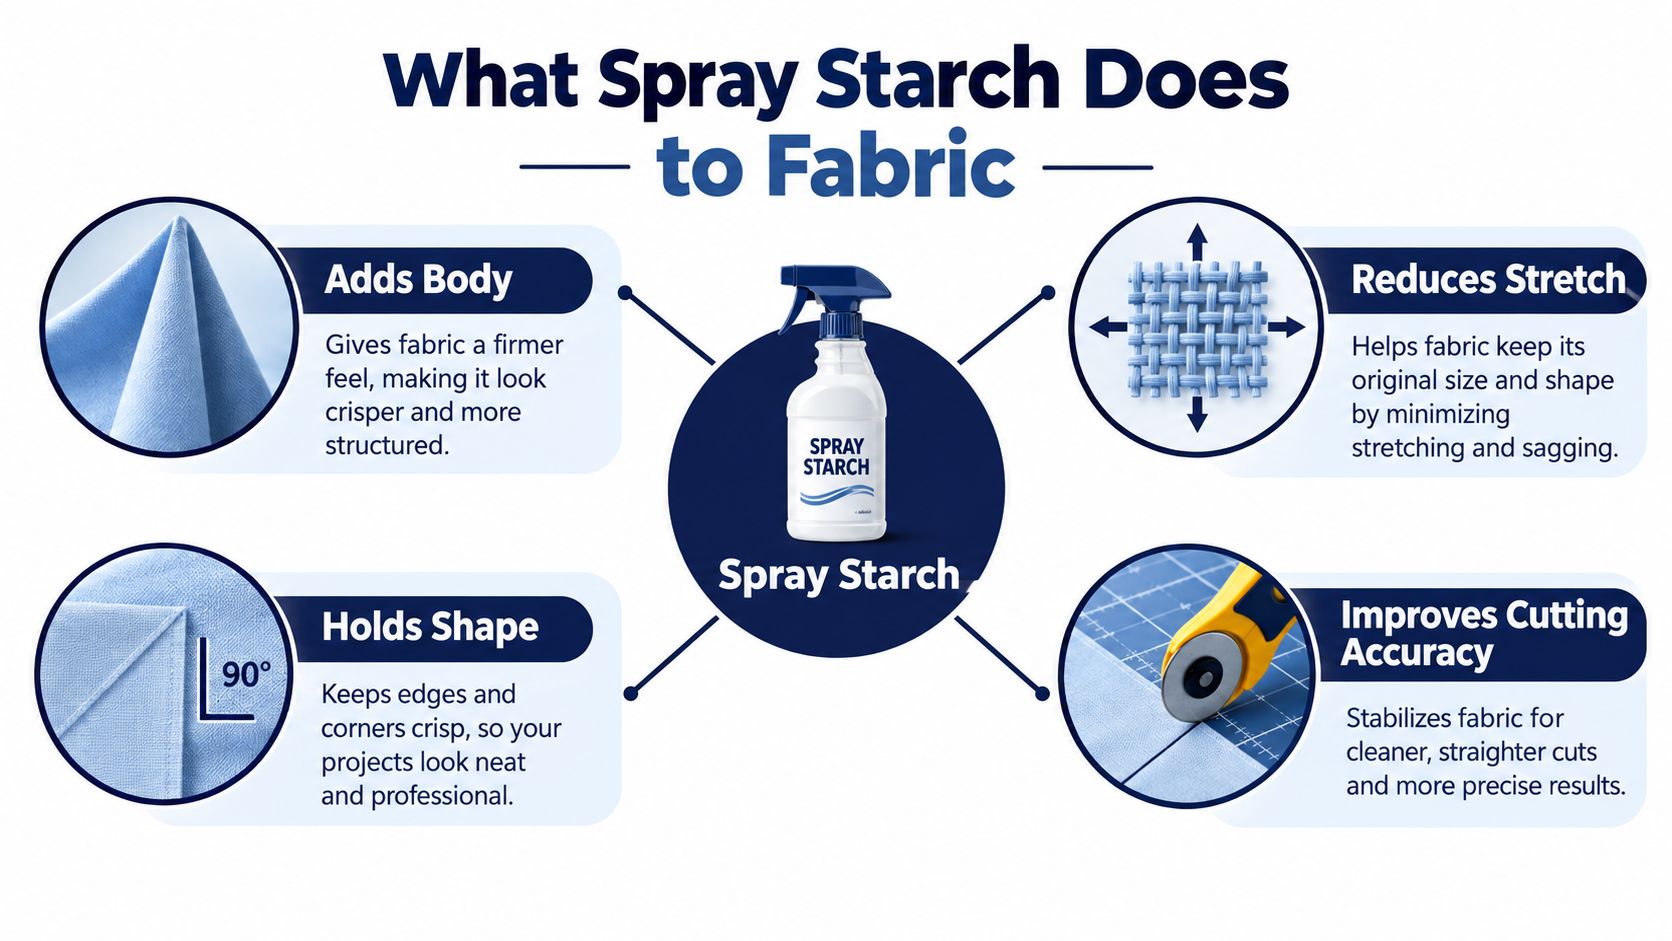
Spray starch deposits a thin film on and between fabric fibers. As the fabric dries, the film adds body and helps the cloth hold the shape created during pressing. The result is a temporary working characteristic, not a permanently rigid quilt, and the fabric generally softens after washing.
That added structure matters at the cutting mat. A stretched edge can produce mismatched points, uneven units, and seams that no longer line up as planned. Starched fabric tends to lie flatter under a ruler and respond more predictably to a rotary cutter, but starch still can't replace a sharp blade, an accurate seam allowance, or careful pressing.
Body is useful, but softness changes
Starch and fabric softener do opposite jobs. Softener lubricates fibers and can leave fabric more relaxed, while starch gives the cloth structure. That doesn't make starch better in every situation. A quilt intended to have a fluid drape may be more pleasant to handle with little or no starch.
The effect depends on how much you apply and how evenly you distribute it. A light coat can steady fabric for cutting and seam pressing. Several heavy coats can create a hard hand, leave residue, or make a mistake harder to correct once the fabric has been cut.
Practical rule: Use the least amount of starch that gives you the control you need.
Starch can also support more consistent folded edges and pressed seams. It's particularly helpful when a fabric wants to spring open or shift as you handle it. If you're preparing fabric before washing, review the guidance on how to preshrink quilting fabric so preparation steps don't work against one another.
Preparing and Pressing Fabric With Spray Starch
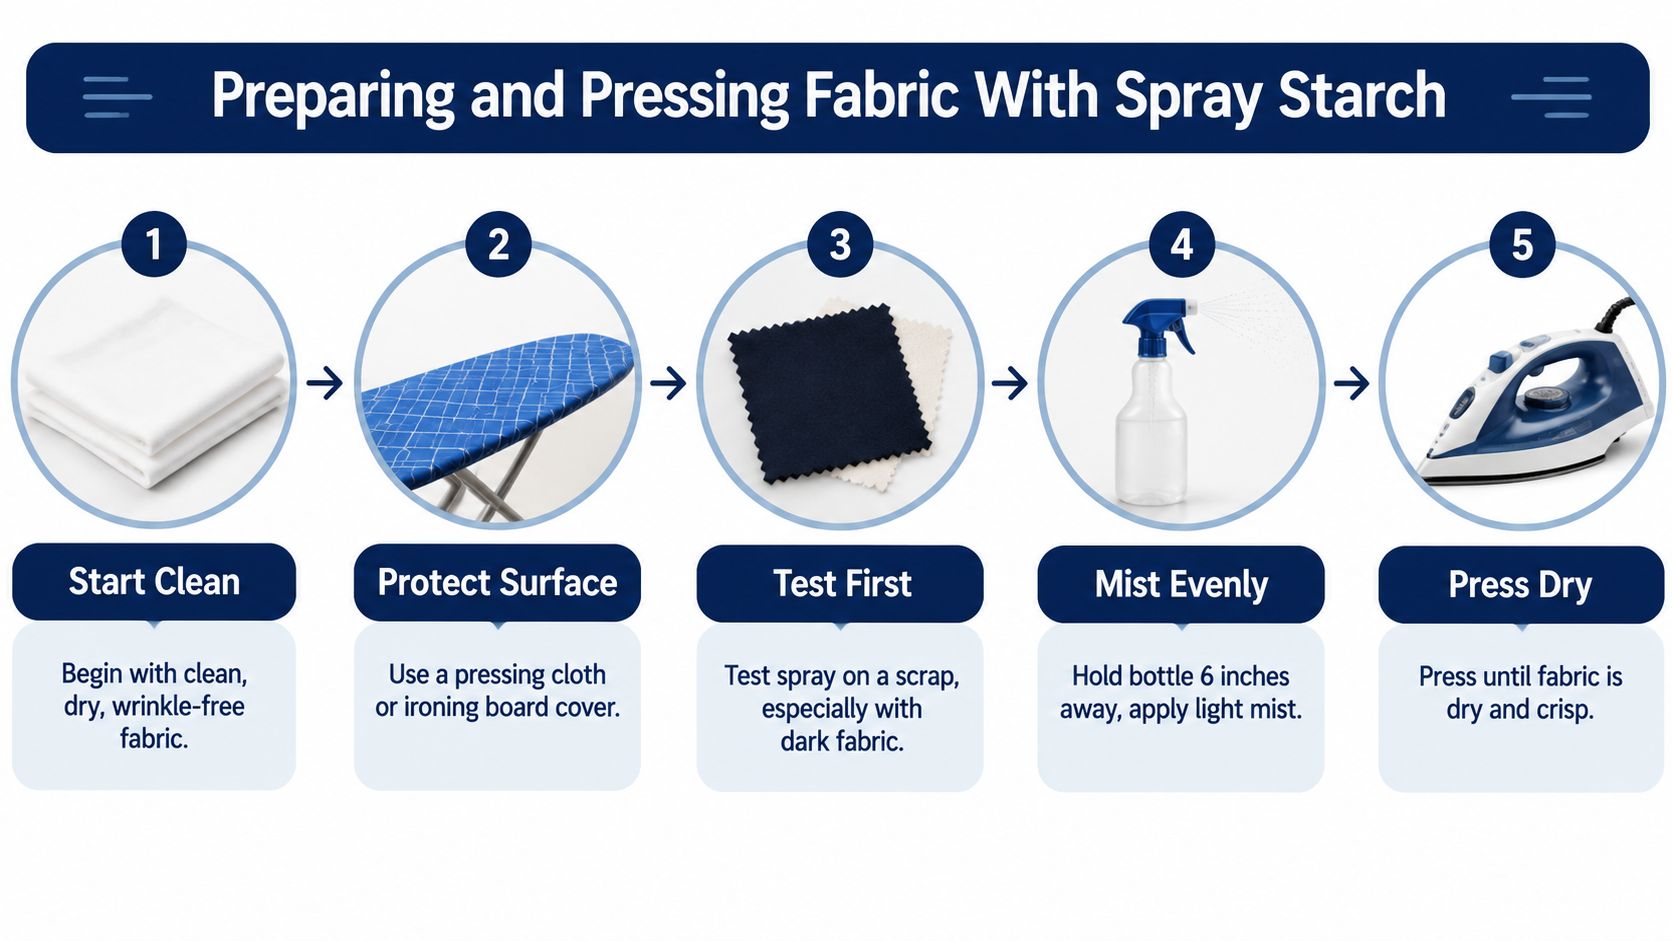
Begin with fabric that's clean, dry, and as smooth as possible. Starch can lock a wrinkle into place, so it won't fix a deep fold that was already present. Protect the ironing surface, clear the spray nozzle, and test the product on a scrap, especially when working with dark prints or saturated batiks.
Apply a light, even mist
Shake the can or bottle according to its directions. Hold it roughly 8 to 12 inches from the fabric, then spray in overlapping passes. The surface should look evenly damp, not soaked, blotchy, or glossy with liquid.
For thick or especially soft fabric, turn it over and repeat lightly on the reverse. Two thin applications usually give better control than one saturated pass because the starch has less chance to pool in one place.
Let the fabric dry before pressing
Wait until the visible wet shine disappears, or until the fabric feels dry to the touch. Pressing too soon is one of the easiest ways to create flakes, uneven stiffness, and residue on the iron. Fabric-care guidance also warns that excess water and steam can remove starch before it sets, so let the treatment dry before final pressing or cutting, as outlined in this steam ironing station guide.
Set the iron to the fabric's recommended cotton setting. For quilting cotton, that's commonly a medium-to-high setting, but follow the product and fabric directions. Keep steam off unless the product specifically calls for it.
Press rather than slide:
- Lower the iron onto the fabric.
- Hold briefly without dragging.
- Lift and move to the next area.
- Allow the fabric to cool before folding or cutting.
This method flattens the fibers without pulling the cloth out of shape. Once the fabric is fully dry and cool, use a sharp rotary blade and a stable ruler. Starch helps fabric behave, but it can't compensate for a dull blade.
Starch vs Sizing vs Starch-Free Sprays
These products can look similar on a sewing-room shelf, but they don't create the same hand. Spray starch is the choice when you want a crisp working finish that can wash away. Sizing adds body with a lighter or more flexible hold, while starch-free pressing sprays focus on relaxing wrinkles without creating much structure.
Read the active ingredients and product description instead of relying only on the front label. Some products marketed to quilters are starch and sizing alternatives, while others are finishing sprays with little stabilizing effect. Plant-based starches and synthetic polymer formulas can behave differently on cotton, blends, and delicate cloth, so a scrap test remains useful.
| Product Type | Stiffness/Hold | Iron Residue | Wash-Out | Best For |
|---|---|---|---|---|
| Spray starch | Crisp body, from light to firm | Can build up if over-applied or pressed wet | Usually intended to wash out | Precision piecing and fabric preparation |
| Fabric sizing | Softer body and flexible hold | Usually lighter, but depends on the formula | Product-dependent | General pressing and manageable structure |
| Starch-free spray | Little added stiffness | Usually low when used as directed | Product-dependent | Finished tops, wrinkle removal, and delicates |
Match the product to the task
Choose starch for crisp piecing where temporary structure helps you cut and align. Choose sizing when you want fabric to handle more neatly without a heavily starched feel. Choose a starch-free spray for final pressing or when preserving the original softness matters most.
The bottle itself can affect how evenly you work. For makers comparing reusable and disposable options, Fillaree's comparison of spray bottles offers useful context about spray formats and reuse. If your project needs permanent structure rather than a temporary finish, an iron-on stabilizer guide may point you toward a more suitable tool.
Matching Starch to Yardage, Precuts, and Project Type
The most economical starch routine starts with the fabric format. Yardage gives you room to spray, dry, press, and square the grain before cutting. Smaller precuts have less margin for correction, and a heavy treatment can make them harder to handle rather than easier.
Yardage from the bolt
A medium starch pass often makes sense before cutting yardage for geometric piecing. The larger piece can absorb the treatment evenly, and the added body can help reduce fraying and movement while you cut strips, diamonds, or repeated units.
Starch is most likely to pay for itself. If the treatment prevents distorted cuts or repeated recutting, the product and pressing time serve a clear purpose.
Precuts need restraint
Fat quarters can justify starch when you're matching points or cutting repeated shapes, but test a corner first. Fold lines, loose weaves, and the limited size of a precut can make over-application inconvenient.
Charm Packs, Layer Cakes, and Jelly Rolls usually need little or no starch for ordinary patterns. Be particularly cautious with narrow 2.5-inch strips, because excess stiffness can make them awkward to press or sew. Recent quilt guidance also cautions against starching precuts smaller than a fat quarter and against storing fabric after starching, so selective use is safer for stash builders.
Use this fat quarter bundle guide when planning projects around precut formats and fabric quantities.
Project type changes the answer
- Miniature quilts: More control can help because small errors become obvious.
- Precision paper piecing: Use starch only if the fabric still shifts around the foundation or folded edges.
- English paper piecing: A crisp finish may help with neat folds, but test first so the fabric doesn't become difficult to needle.
- Large bed quilts: Use a light application or skip starch when a soft drape is part of the design.
- Appliqué: Starch can help shapes lie flat, especially when edges need careful placement.
A precision tool should be selective. Don't starch every piece in your stash because it's available. Treat the fabric that needs control, then preserve time and product for the sections where accuracy matters.
Common Starch Problems and How to Fix Them
Most starch problems begin with one of three habits: spraying too heavily, pressing before the fabric dries, or using more heat than the fabric needs. The fix usually involves less product and more patience.
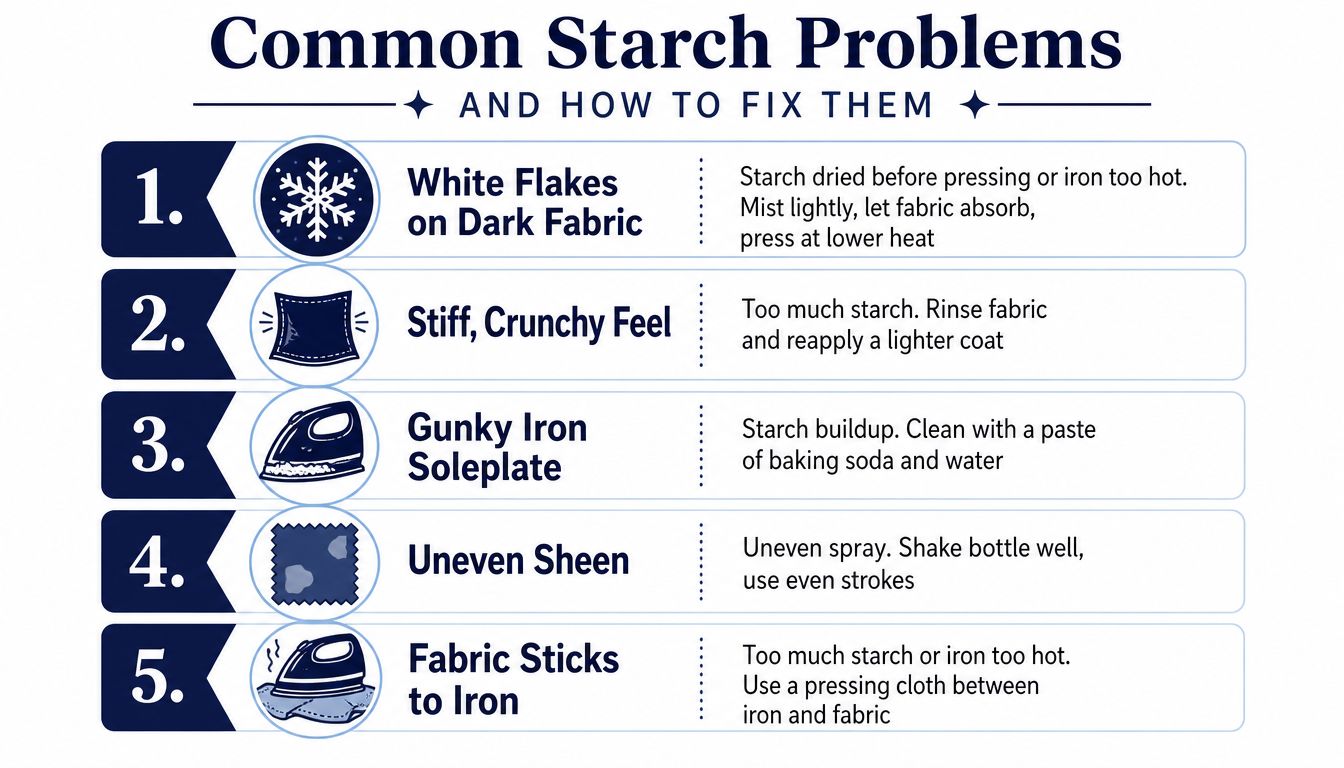
White flakes on dark fabric are a classic warning sign. Starch may have dried on the surface before the iron set it, or the iron may have been too hot. Mist lightly, allow the fabric to absorb the spray, and press at a lower setting that still suits the fabric.
Diagnose the mark before correcting it
- White flakes: The spray dried too long or the iron was too hot. Lighten the mist and press after absorption.
- Crunchy fabric: Too much product created more stiffness than the project needs. Wash or rinse the fabric, then reapply a lighter coat if necessary.
- Gunky soleplate: Dried starch has built up on the iron. Clean the soleplate before it transfers residue to another block.
- Uneven sheen: The spray didn't cover consistently. Shake the bottle and use overlapping passes from a steady distance.
- Fabric sticking to the iron: The fabric is too wet, the starch layer is too heavy, or the heat is too high. Use a pressing cloth and reduce the treatment.
Scorch marks usually come from holding the iron in one spot or pressing over a heavily starched seam allowance. Keep the iron moving from place to place, and avoid forcing heat into a damp, saturated area.
For brown residue, turn off and cool the iron before cleaning it. A paste made from baking soda and water can help remove buildup from the soleplate, but check the iron manufacturer's care instructions first.
Wipe the iron between blocks when you're working through a heavily starched batch. That small pause can prevent residue from spreading across an entire project.
Uneven stiffness often means your spray distance changed as you worked. Hold the can consistently, mist in sections, and let each section dry evenly before pressing.
Washing and Caring for Starched Quilts
Starch changes how fabric behaves during construction, but the first wash can change the quilt's feel again. Surface residue may loosen during laundering, and a quilt that felt crisp in the studio may return to a softer hand once it's clean.
Before washing, remove pins and basting threads, trim loose threads, and shake the quilt gently outdoors or over a clean surface. This helps release loose starch dust before it reaches the washer. Don't store a finished quilt starched and unwashed for a long period. Plant-based starch residue can attract bugs, and good ventilation helps limit lingering spray and fragrance in the work area, as discussed in this guide to starching quilt fabrics.
Build a careful first-wash routine
Choose water temperature and detergent based on the fabric, batting, dyes, and quilt pattern. A cool or warm cycle may be appropriate, but follow the care requirements for the materials in your quilt. Dark batiks may need special attention, and avoiding optical brighteners can help protect the appearance of dark textiles.
Wash the quilt alone when color transfer or tangling is a concern. Color catchers can provide an extra precaution, but they don't replace a fabric test or careful sorting.
If starch buildup remains, a white vinegar rinse may help loosen residue. Use it as a rinse aid rather than pouring it directly onto dry fabric, and never combine vinegar with chlorine bleach. Test your laundering approach on a sample or less-visible section when the quilt contains uncertain dyes.
Dry the quilt in a way that preserves its shape. A low-heat dryer setting may be suitable for some quilts, while others are better supported on a clean, flat surface. Avoid storing the quilt while it's even slightly damp, because trapped moisture can create musty odors.
Store it clean and completely dry
Fold the quilt along broad lines rather than crushing crisp edges into tight folds. For display quilts, refold them occasionally so one crease doesn't remain in the same place indefinitely. Store finished pieces in a clean, dry area away from direct sunlight, pests, and strong household scents.
Fragrance deserves its own caution. If you use a product such as Blushing Ivy Home Fragrance's room and linen spray, keep scented products away from stored quilts unless the fabric-care directions and your personal preferences support that choice. Fragrance residue is separate from starch, and neither should replace clean, dry storage.
The complete workflow is simple: prepare only when control is needed, apply lightly, let the fabric dry, press with care, wash before long-term storage, and inspect the iron as you work. That approach gives you the accuracy benefits of quilting spray starch without turning every project into a stiff, residue-heavy chore.
For your next precision project, visit The Fabric Company for quilting cottons, precuts, batting, 108-inch quilt backings, and the notions that make careful piecing easier. Shop our latest quilting fabric collection, then join The Weekly Thread for more tips and 10% off your first order.