

Your quilt is stitched, the edges are still raw, and you're worried that the final step could spoil all that work. Quilt binding for beginners is easier when you treat it as a series of checks: choose a suitable strip, measure the edge, sew a steady seam, and fold each corner without pulling. If something looks wrong, check the measurement or fold before taking apart a whole side.
Pick the Binding Style and Fabric Before You Cut
Does binding style change how a quilt looks and wears? Yes. Double-fold binding, also called French binding, is the practical starting point for a straight-edged quilt because its folded fabric protects the edge during everyday use.
Bias binding bends around curves. Facing turns the edge treatment out of sight, which suits an art quilt where a visible frame would interrupt the design.
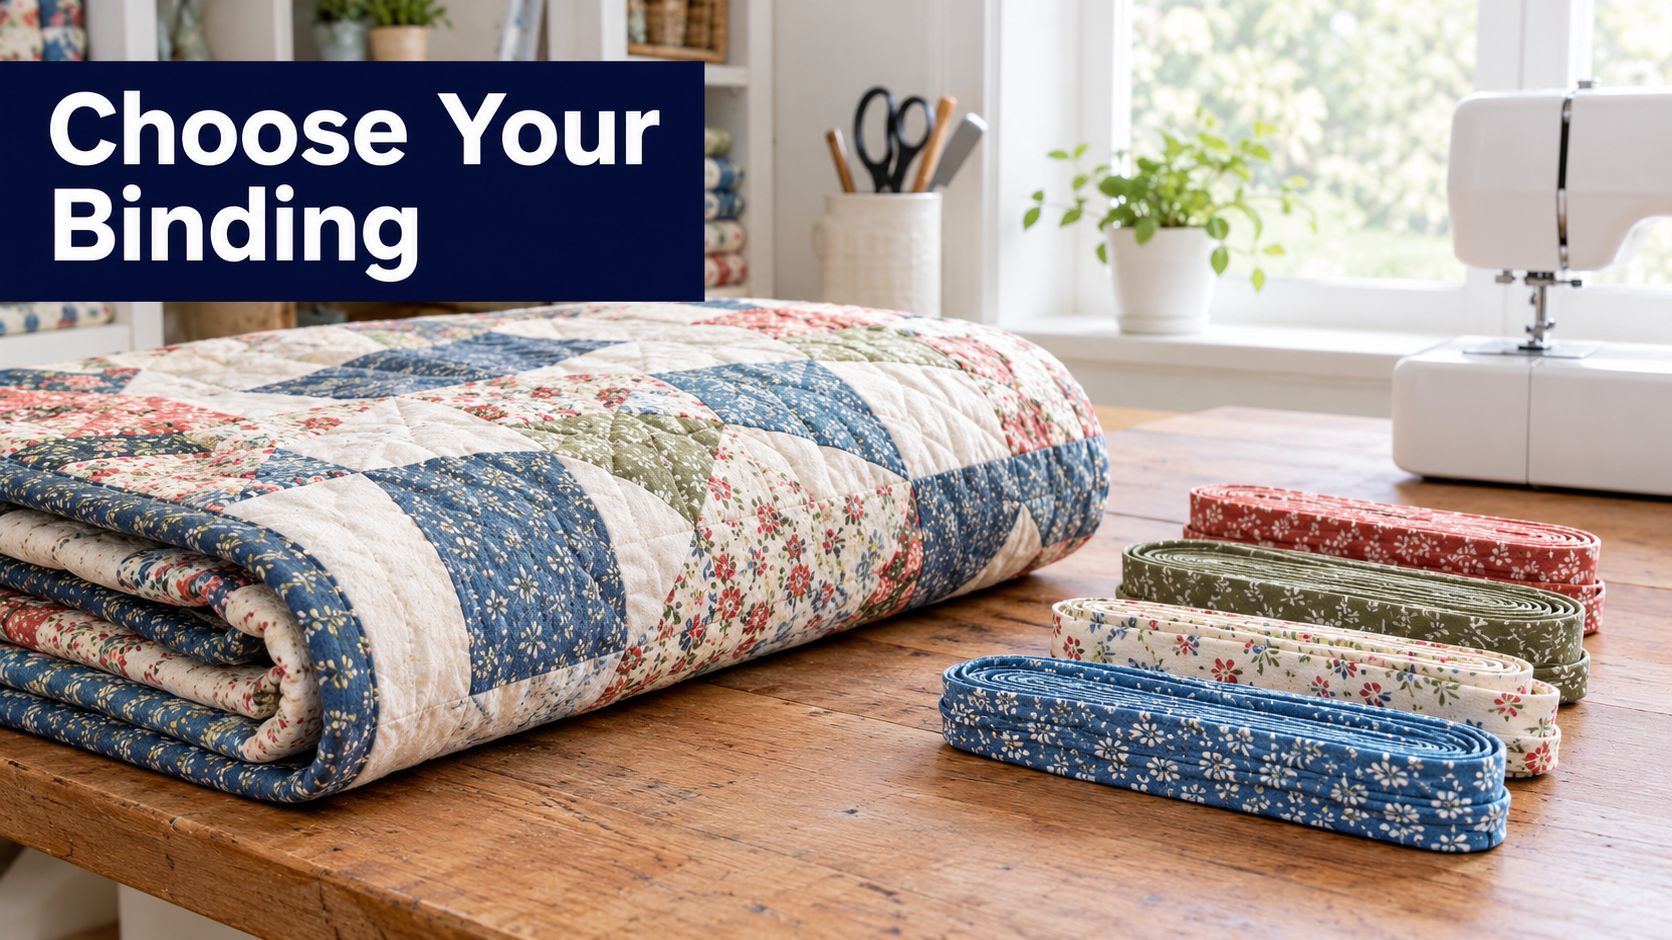
Compare binding colors against your patchwork. A Robert Kaufman or Riley Blake Designs solid is an easy-to-coordinate option.
Binding styles compared
| Binding style | Strip cut | Look and durability | Best for |
|---|---|---|---|
| Double-fold (French) binding | 2.25-inch crosswise strips folded in half | Two fabric layers, durable, most common for beginners | Straight-edged bed quilts and kids' quilts |
| Bias binding | 2.25-inch strips cut on the 45-degree bias | Stretches around curves, slightly more fabric used | Scalloped edges and curved quilts |
| Facing | Border strip attached at the edge and turned completely to the back | Flat finish with no visible binding on the front | Art quilts and wall hangings |
Brother's 2024 binding guide describes finished widths from approximately 0.25 inch (7 mm) to 1 inch (2.54 cm) or wider. A standard double-fold strip produces a finish near the narrow end, but batting thickness affects how much fabric remains visible.
Choose quilting cotton for a manageable first project. It presses into crisp folds more readily than thick flannel or slippery minky. Use the guide to choosing quilt fabric to narrow your choices before buying.
What You'll Need
- Binding fabric: Quilting cotton from yardage, coordinating remnants, Jelly Rolls, or Fat Quarters for scrappy binding.
- Cutting tools: A rotary cutter, a 6-by-24-inch ruler, and a cutting mat.
- Sewing tools: A quarter-inch presser foot, clips or fine pins, neutral thread, and a hand needle if finishing by hand.
- Pressing tools: An iron and a firm pressing surface.
- Batting: Your quilt's middle layer. Its loft, or thickness, affects how the binding wraps.
- Precuts: Ready-cut strips save cutting time. Charm Packs and Layer Cakes need more joins and are better reserved for practice pieces.
Choose the binding before finishing the quilt top. That way, its color echoes the patchwork or contrasts with it on purpose.
How Much Binding Fabric to Buy for Your Quilt
Binding length = twice the length + twice the width + an allowance. Measure the quilt after quilting and squaring, rather than relying on the pattern's planned dimensions.
Utah State University Extension recommends adding 10 inches to the perimeter; its 60-by-72-inch example has a 264-inch perimeter and a 274-inch binding requirement. That extra length gives you working room for corners, seams, and trimming.
Turn Length Into a Shopping Amount
For a worked example, assume your fabric provides 42 inches of usable width after removing the selvages. Dividing the example's required length by that usable width gives seven strips when rounded up.
That calculation is a starting estimate, not a guarantee. Diagonal joins shorten the assembled strip, so check its finished length before attaching it. Narrow fabric, generous trimming, or numerous joins can require another strip.
Binding yardage by quilt size
These purchase estimates assume the usable width above and 2.25-inch strips. They include practical buying room rather than representing the smallest possible cut.
| Quilt size (inches) | 2.25-inch strips | Buy (approx.) |
|---|---|---|
| 36 by 36 (baby) | 4 | 1/2 yard |
| 60 by 72 (lap) | 7 | 1/2 yard |
| 50 by 60 (lap) | 6 | 1/2 yard |
| 66 by 90 (twin) | 8 | 3/4 yard |
| 90 by 108 (queen) | 10 | 3/4 yard |
| 108 by 108 (king) | 11 | 3/4 yard |
For shopping arithmetic, a yard yields about sixteen strips at this cutting width before allowing for squaring the fabric. Divide the strip count by sixteen, then buy additional room for mistakes. The smallest project benefits from a cushion too.
Buying rule: Get the full binding amount from a single bolt. A later purchase may look close without matching.
Say you cut binding for a queen quilt and discover the strip is short during attachment. Buying more from another bolt could introduce a noticeable shade change. It's less frustrating to have a useful remnant than a nearly finished quilt waiting for a match.
Use the fabric yardage calculation guide when planning the rest of your materials. Write the binding requirement on a note beside your cutting mat before cutting.
For larger quilts, consider 108-inch backings and batting rolls during the same shopping trip. Wide backing can reduce piecing, but check the actual quilt width and any extra backing your quilting method requires. A backing that only matches the quilt's width won't leave working room.
Keep your measurements nearby while watching the attachment process.
How to Cut and Join Binding Strips
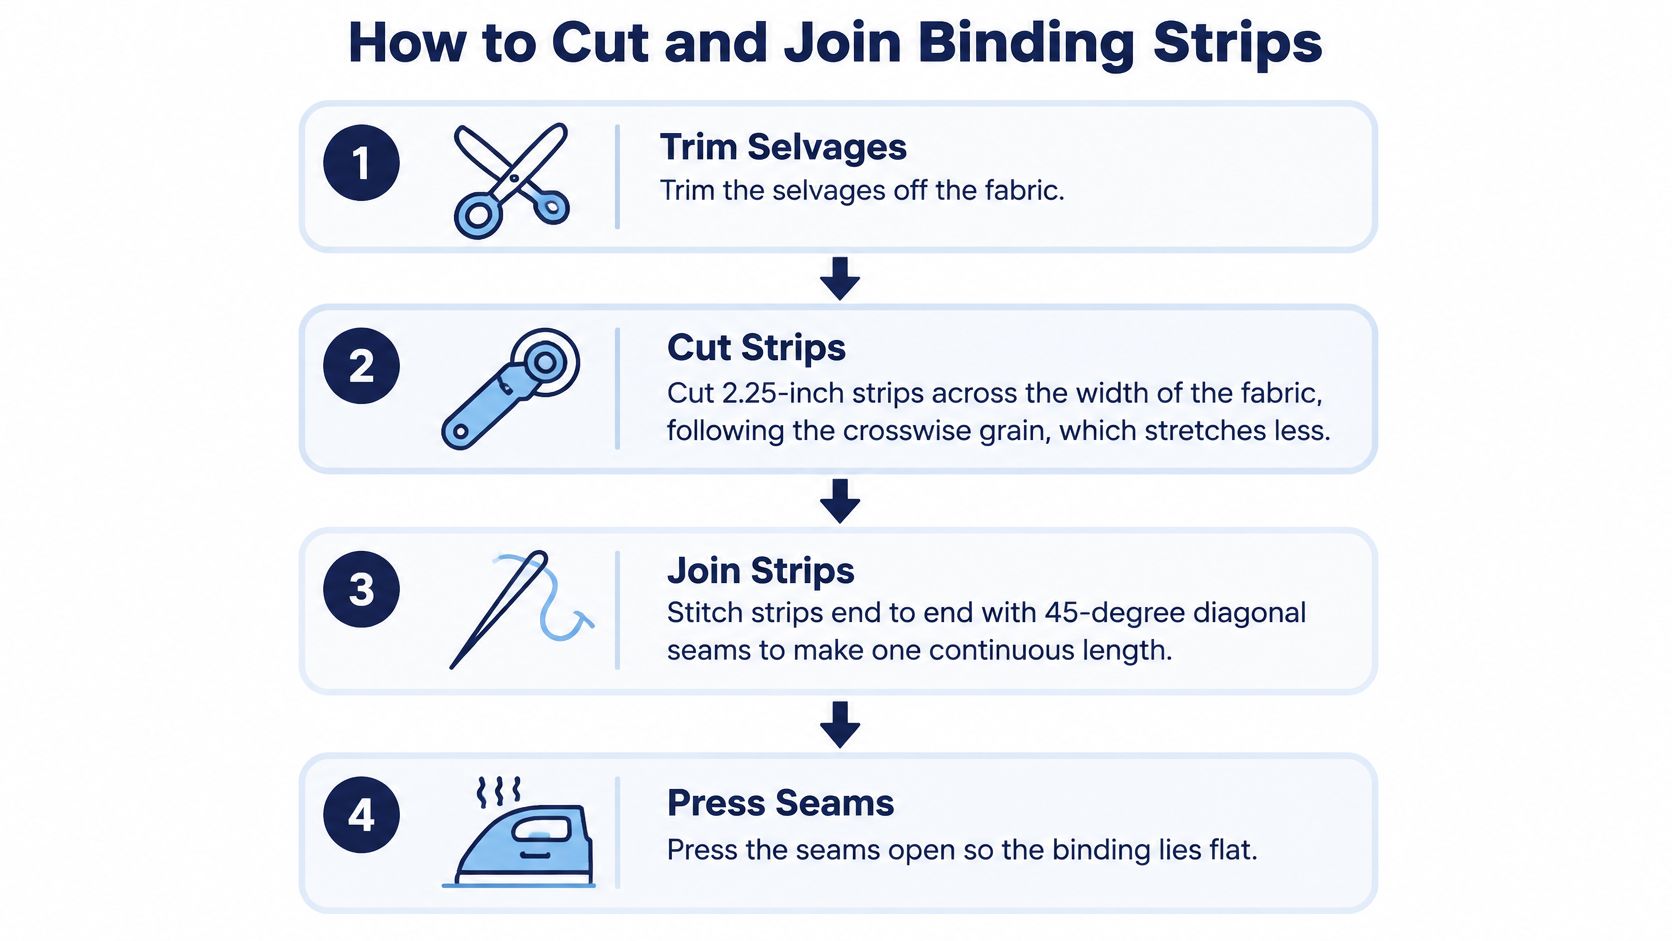
Make the entire binding before attaching it. You'll be able to check its length, remove twists, and shift bulky joins away from corners.
Utah State University Extension's French-binding instructions describe diagonal joins and a starting tail of approximately 6 inches. Leaving the tail loose creates space to connect the ends later.
- Remove the selvages. These tightly woven fabric edges don't fold like the rest of the cotton, so trim them away before joining.
- Cut uniform 2.25-inch strips across the fabric width. This follows the crosswise grain, which has a little more give than the lengthwise grain but much less stretch than bias.
- Place the ends of two strips right sides together at a right angle. The right side is the printed or intended outward-facing surface.
- Draw a diagonal across the overlap and sew on that line. Open the strips to check that they form a straight length before trimming the excess to a quarter-inch seam allowance.
- Press the seam open and repeat until the binding is long enough. Diagonal seams spread the seam allowance across the strip instead of stacking it in a thick lump.
- Fold the completed strip lengthwise with wrong sides together, then press. The right sides should remain visible, with the raw edges aligned.
Choose a cutter that feels secure in your hand using the rotary cutter selection guide. Close the blade whenever you set it down.
Jelly Roll strips can replace strips cut from yardage for a slightly wider finish. Fat Quarters make shorter, scrappy lengths, but remember that extra joins consume fabric.
Check the join-and-press sequence before taking the binding to your machine.
Press cotton binding gently. Robert Kaufman and Cloud9 quilting cottons are examples of fabrics you can use for practice.
Machine, Hand, or Hybrid Attachment Compared
A binding can look uneven for different reasons: the machine may have missed the folded edge, the hand stitches may be too far apart, or the quilt may be shifting as you sew. Choose a method that lets you control the cause you're most likely to encounter. Hybrid binding means machine attachment followed by hand finishing, not a different kind of binding strip.
| Method | Time | Front finish | Durability | Best for |
|---|---|---|---|---|
| Machine on both sides | Fastest | Crisp and consistent when the seam is guided well | Strong | Charity quilts and large bed quilts |
| Hybrid: machine front, hand back | Moderate | Clean front, finishing stitches on the back only | Strong | Beginners who want neat results with less handwork |
| Hand on both sides | Slowest, often many hours on a throw | Nearly invisible stitches | Strong when stitched evenly | Heirloom quilts and irregular edges |
Use machine stitching when speed matters and you can keep the folded edge aligned with the seam. Attach the binding to the back first, wrap it to the front, then topstitch near the fold. A seam guide helps keep that line steady.
For thick batting or a minky backing, a compatible walking foot can help feed the quilt layers together. Learn how a walking foot helps feed layers evenly. Support the quilt's weight so it doesn't pull against the needle as you sew.
Check Comfort and Machine Setup
Set up with a sharp needle suited to quilting cotton, balanced thread tension, and a seam guide. Test your settings on a practice quilt sandwich, a top, batting, and backing layered together. If stitches skip or the layers shift, adjust the setup before sewing the quilt.
PFAFF machines are one option to compare when shopping for a first machine. The Fabric Company carries PFAFF and SINGER machines online and at its Springfield, Tennessee showroom, so you can compare models before you buy.
A finish you can sew comfortably and consistently is more useful than a traditional method that leaves your hands aching.
For a hand-finished back, wrap the binding around the edge until the fold covers the attachment stitching. Clip or pin it at comfortable intervals to keep the layers in place without pulling them tight. Then use short blind stitches, catching the binding fold and a little backing without bringing the needle through to the front.
How to Sew and Miter Each Corner
A miter is the diagonal fold that lets binding turn a square corner neatly. The key measurement is where you stop sewing, not how firmly you press the fold.
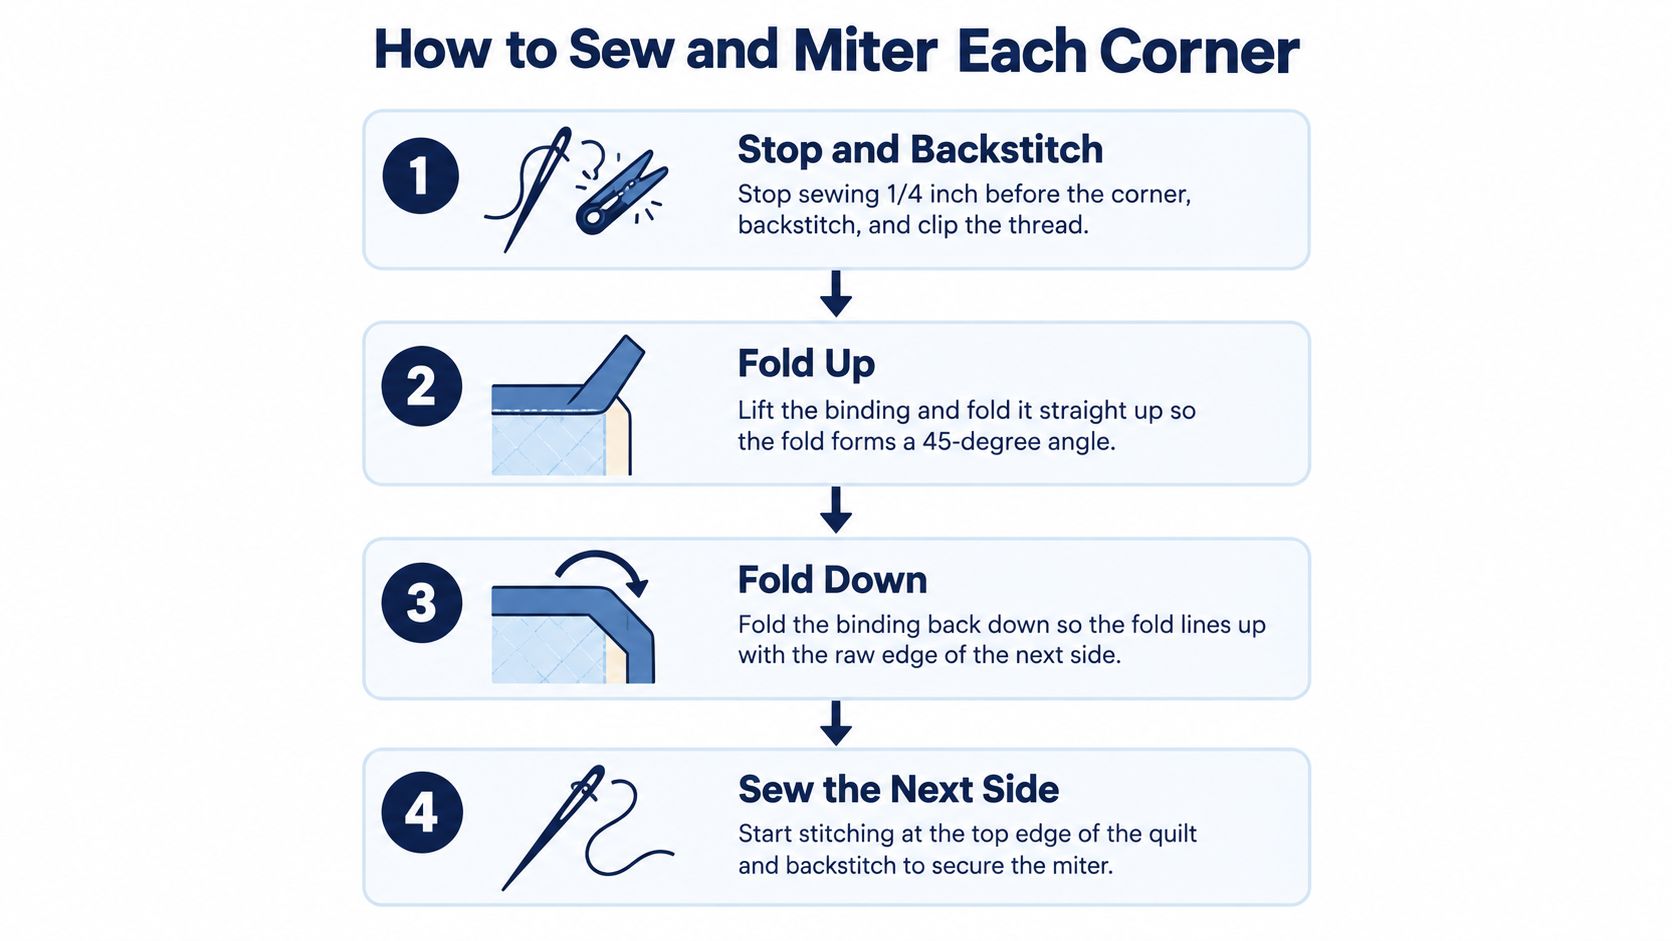
The Spruce Crafts says the stopping distance should equal the seam allowance; with a 1/4-inch seam, stop that far before the corner, then fold the tail upward into a 45-degree angle.
Make the Turn
Before starting, square the quilt and align the binding's raw edges with its raw edge. For hybrid finishing, work from the front and begin along a straight side, leaving the starting tail free.
- Sew toward the corner, stop at the marked stopping point, backstitch, and clip the thread. A small removable mark is easier to follow than guessing beneath the presser foot.
- Lift the free binding straight upward. Its raw edge should continue the direction of the approaching quilt edge, creating a diagonal fold beneath it.
- Fold the strip back down along the next side. Keep the horizontal fold level with the quilt's top edge and align the raw edges.
- Begin stitching at the top edge and continue along the new side. Don't sew through the diagonal tuck underneath.
- Repeat at each corner without stretching the strip.
Check the fold arrangement against this visual before stitching.
Practice the fold with a Riley Blake Designs cotton remnant before working on the quilt.
Practice and Close the Loop
Try a corner on scraps, then wrap it to the back. The binding should form a flat diagonal meeting line rather than a twisted flap.
Stopping early can leave a loose corner; sewing too far can trap the fold and create bulk. If a corner looks wrong, repair that area before continuing rather than assuming an entire side needs removal.
For the final connection, lay the tails flat and mark where they meet without tension. Open them, add the seam allowances needed for an end-to-end join, sew, check the fit, then trim and press open. Refold the binding and attach the remaining section.
Fixing Common Binding Problems Fast
A wavy edge is a reason to inspect your feeding technique, not immediately trim the quilt. Unpick a short affected area and see whether the quilt relaxes when the binding is released.
Utah State University Extension's crosswise-binding guide provides the 1/4-inch seam and corner-stop checkpoints. Use a ruler to check them instead of judging by appearance alone.
Binding symptoms, causes and fixes
| Symptom | Likely cause | Fix |
|---|---|---|
| Wavy or rippled edge | Binding was stretched while sewing | Re-pin, guide without pulling, and unpick a short section if needed |
| Binding runs short at the end | Perimeter allowance or join losses were missed | Join an extra strip before finishing |
| Back edge doesn't cover the stitching | Seam allowance drifted or binding is too narrow for the loft | Restore a consistent seam and check wrap coverage before finishing |
| Gap or bulk at a corner | Incorrect stop point or diagonal fold | Unpick the corner and reset the stop and fold |
| Backward miter showing on the front | Fold direction was reversed | Practice on scrap, then fold up before folding down |
| Puckering along the inside edge | Inaccurate bias cutting or pulling | Replace distorted strips or redistribute fullness gently |
| Visible stitches on the front | Hand stitches pass too deeply or are pulled tight | Take smaller bites of backing and relax thread tension |
Unpick or Retrim?
Check the quilt's squareness and layer alignment first, followed by seam consistency, cutting grain, and feeding pressure. Use the seam ripper guide to remove stitches without cutting the backing.
If the exposed quilt edge lies flat and straight, repair the binding locally. Retrim only when the quilt itself has an uneven or unsquared edge, and protect nearby patchwork points.
Fix the cause before the symptom, or the same problem returns on the next side.
Start Your First Binding Project This Week
A baby quilt or small wall hanging gives you room to learn the motion before the quilt can pull against the needle. Make one practice corner first and measure where you stop: the turn works when the needle stops the binding width from the edge and the fold can close the corner cleanly.
Buy the yardage from your cutting table with a little extra room, all from the same bolt. Pick a cotton that shows clearly against the backing so you can check the wrap and spot a shallow seam before it reaches the front.
Give Yourself a Simple Finish Plan
- Choose your method by deadline: machine finishing when speed matters, hand finishing when you want quiet control on the final edge.
- Set up the support: keep the quilt beside the machine so its weight cannot drag the seam allowance off line.
- Save test pieces: a practice sandwich and matching thread let you try a repair before touching the quilt.
- Scale up deliberately: for a bed quilt, check backing dimensions and batting loft first; 108-inch backing and batting rolls can suit larger projects.
Precuts can shorten preparation, but check usable width and total length before you commit. A first edge succeeds when it covers the raw layers, stays flat, and keeps each corner stop consistent.
Visit The Fabric Company for quilting cottons, precuts, batting, and tools to prepare and finish your binding. Join The Weekly Thread for more tips and 10% off your first order.