

You've pressed your fabric, cleared the cutting table, and started a pile of strips, but some are wider at one end than the other. A slotted ruler for quilting guides your rotary blade through fixed openings so you can repeat widths without marking every cut, provided your starting edge is square. It's most useful for batches of matching pieces; for a few straight cuts, a standard ruler and a checked test strip may be all you need.
What a Slotted Ruler Does in Your Cutting Setup
A slotted ruler is an acrylic measuring ruler with openings that accept a compatible rotary blade. Instead of moving a straightedge for every strip, you leave the ruler in place and select the channels that produce your chosen width.
Say you're cutting matching strips for a charity quilt. With a plain ruler, you align the measurement, anchor the ruler, cut, and reposition. With a slotted model, you can make several cuts from the same placement, reducing the number of times you need to line everything up.
The channel guides the blade, not the fabric. If the fabric bows underneath or the ruler moves, the cut can still be wrong.
The setup shown below puts the ruler over the fabric while the cutter travels through a selected opening.
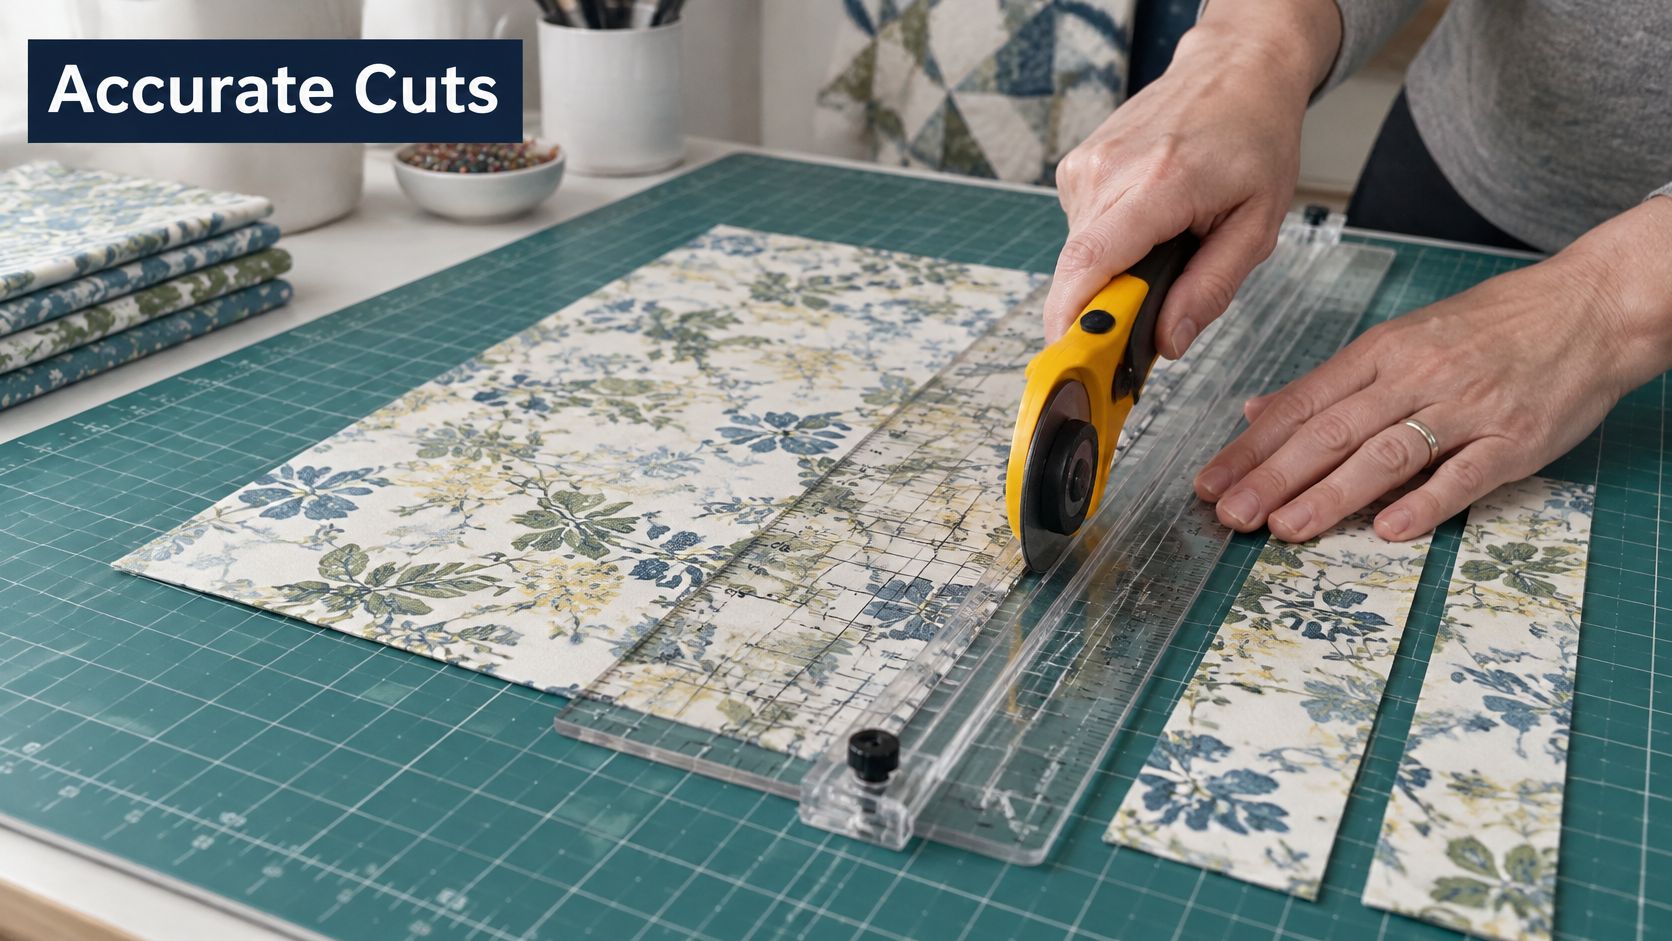
How the cutting system works
Each tool has a separate job:
- Rotary cutter: Supplies the cut with a sharp, rolling blade.
- Self-healing cutting mat: Protects the work surface and supports the fabric beneath the blade.
- Slotted ruler: Supplies the measurement and a fixed cutting path.
This system grew out of rotary cutting. The rotary-cutter history presentation dates the invention to 1979, shipping to Canada and the United States to 1980, and the initial 45 mm model's reported retail price to less than $20.
Slots aren't the same as grooves
A printed grid helps you measure, but it doesn't contain a cutting channel. An underside alignment groove may fit over a sewn seam, but it isn't necessarily an opening for your blade. Look for actual cut-through slots and check the manufacturer's cutter compatibility.
Beginners who find repeated alignment tiring, precut enthusiasts cutting coordinated yardage, and guild groups preparing matching batches can all benefit. The strongest reason to buy one isn't that it makes every cut perfect. It's that it removes repeated positioning from a job you do often.
Practical rule: Buy the tool for the cutting task you repeat, not for the promise that you'll never miscut fabric again.
Cut Sizes for Common Quilt Projects
Cut sizes and slots for common quilt pieces
| Piece | Cut size | Slot or line | Rotary cutter |
|---|---|---|---|
| Jelly roll strips | 2-1/2 in wide | 2-1/2 in slot | 45 mm |
| Half-square triangle squares (4 in finished) | 4-7/8 in squares, cut once on the diagonal | Square line, then diagonal line | 45 mm |
| Binding strips | 2-1/4 in wide | 2-1/4 in slot, if provided | 45 mm |
| Narrow piecing strips | 1-1/2 in wide | 1-1/2 in slot | 28 mm |
| Border strips | Finished width + 1 in for a plan allowing 1/2 in at each edge | Matching strip slot | 45 mm |
Treat these as project cutting examples, not a promise that every slotted ruler includes every listed opening. Your pattern's construction method and seam allowance take priority.
Match the cut size to an actual slot
Find the required width before placing fabric under the ruler. Then check whether the ruler has a channel at that position, rather than merely a printed measurement line.
For example, a ruler with half-inch slot spacing won't automatically provide a quarter-inch binding slot or an eighth-inch square-cutting position. Don't tip the blade against a channel wall to force an in-between measurement. Use a suitable offset method only if the manufacturer explains it, or switch to a standard ruler.
The BOHIN slotted patchwork ruler specification lists 1/2-inch slot spacing for its inch-calibrated version and 1-centimeter spacing for its metric version, with a 30 × 15 cm format compatible with 28 mm and 45 mm cutters.
Those specifications describe spacing and fit. They don't make the inch and metric versions interchangeable for every pattern.
Read finished dimensions carefully
A cut size includes fabric that will disappear into seams. A finished size describes the piece after assembly.
For the half-square triangle example in the table, add 7/8 inch to the finished unit size when using the traditional method of cutting squares diagonally before sewing. That's a different calculation from methods that begin with larger squares and trim the sewn units afterward.
The border example needs special care. Adding 1 inch works when your project plan reserves 1/2 inch at each edge. It isn't the universal border formula. For ordinary patchwork, calculate the cut width from the finished width plus the actual seam allowance at each long edge, and follow the pattern's instructions for binding coverage.
For binding, choose Quilting Cotton that suits the quilt's wear and washing needs. Use the pattern's strip width rather than assuming every binding fold requires the same cut.
Let precuts remove unnecessary work
Jelly Rolls already supply strip-width fabric, so you can skip cutting yardage into matching narrow strips. You may still need to subcut lengths, join strips, or straighten an uneven end.
For project planning, use this guide to working with Jelly Rolls. Whether you start with yardage or precuts, check a test piece against the ruler's printed width before committing the batch.
What You'll Need Before Your First Cut
Set up for the project you're making, not every quilt you might make later. A compact, stable arrangement is more useful than a crowded table covered with specialty tools.
Cutting-table checklist
- Slotted ruler: Choose the slot widths your pattern really uses. Check that the openings extend far enough to complete the cut without awkward repositioning.
- Rotary cutter: A 45 mm cutter is a practical choice for long strips, while a 28 mm cutter can feel easier to steer through narrow work. Confirm that both the blade and cutter housing fit the ruler.
- Self-healing mat: Use a mat large enough to support the whole cutting area. If you're using a 24-inch ruler, the working surface must accommodate it without the blade running beyond the mat.
- Replacement blade: Fit a sharp blade before starting if the current one leaves connected threads or requires extra pressure.
- Iron and pressing surface: Flatten folds and wrinkles before measuring. Press rather than dragging the iron across fabric that stretches easily.
- Non-slip support: Use ruler grips or a suitable non-slip arrangement when fabric or acrylic slides. Keep added grips clear of channels and make sure they don't leave the ruler rocking.
- Good lighting: Position the light so your hand doesn't cast a shadow across the selected slot. Check that printed lines remain readable against the fabric.
For surface setup and care, follow the cutting-mat guide before laying out your yardage.
Fabric and finishing supplies
Precuts offer a manageable start. Jelly Rolls suit strip projects, while Layer Cakes and Charm Packs work well when you want to begin with squares. Fat Quarters give you more freedom to choose strip direction and placement.
For custom piecing, look for Quilting Cotton from brands such as Riley Blake Designs, Cloud9, and Robert Kaufman. Coordinate the background and binding before cutting so you don't discover that an essential fabric is missing halfway through assembly.
- Backing: Plan for a 108-inch backing when that width suits your quilt. Check the finished top and quilting method before deciding how much overhang you need.
- Batting: Choose packaged batting or batting rolls according to project volume. Compare loft, scrim, and needle-punched cotton options based on the finish and quilting method you want.
- Remnants: Keep straight-grain remnants for test cuts. Save stretched selvage edges for another use rather than treating them as reliable measuring references.
A standard ruler can perform the same basic strip-cutting job, but it doesn't provide the same fixed-channel workflow. Don't replace a serviceable ruler just to own more acrylic.
Before starting, multiply your planned strip count by the cut width and allow for squaring and waste. Then confirm that the ruler covers the intended cutting run; if it doesn't, plan smaller batches.
How to Cut Accurate Strips and Half-Square Triangles
A strip that measures correctly at one end can still drift if the fabric shifts during the cut. Press the fabric flat, spread your fingers to stabilize the ruler, and keep the blade beside the guide. Use controlled pressure; if the blade struggles, stop rather than bearing down.
This visual routine shows the preparation and cutting stages.
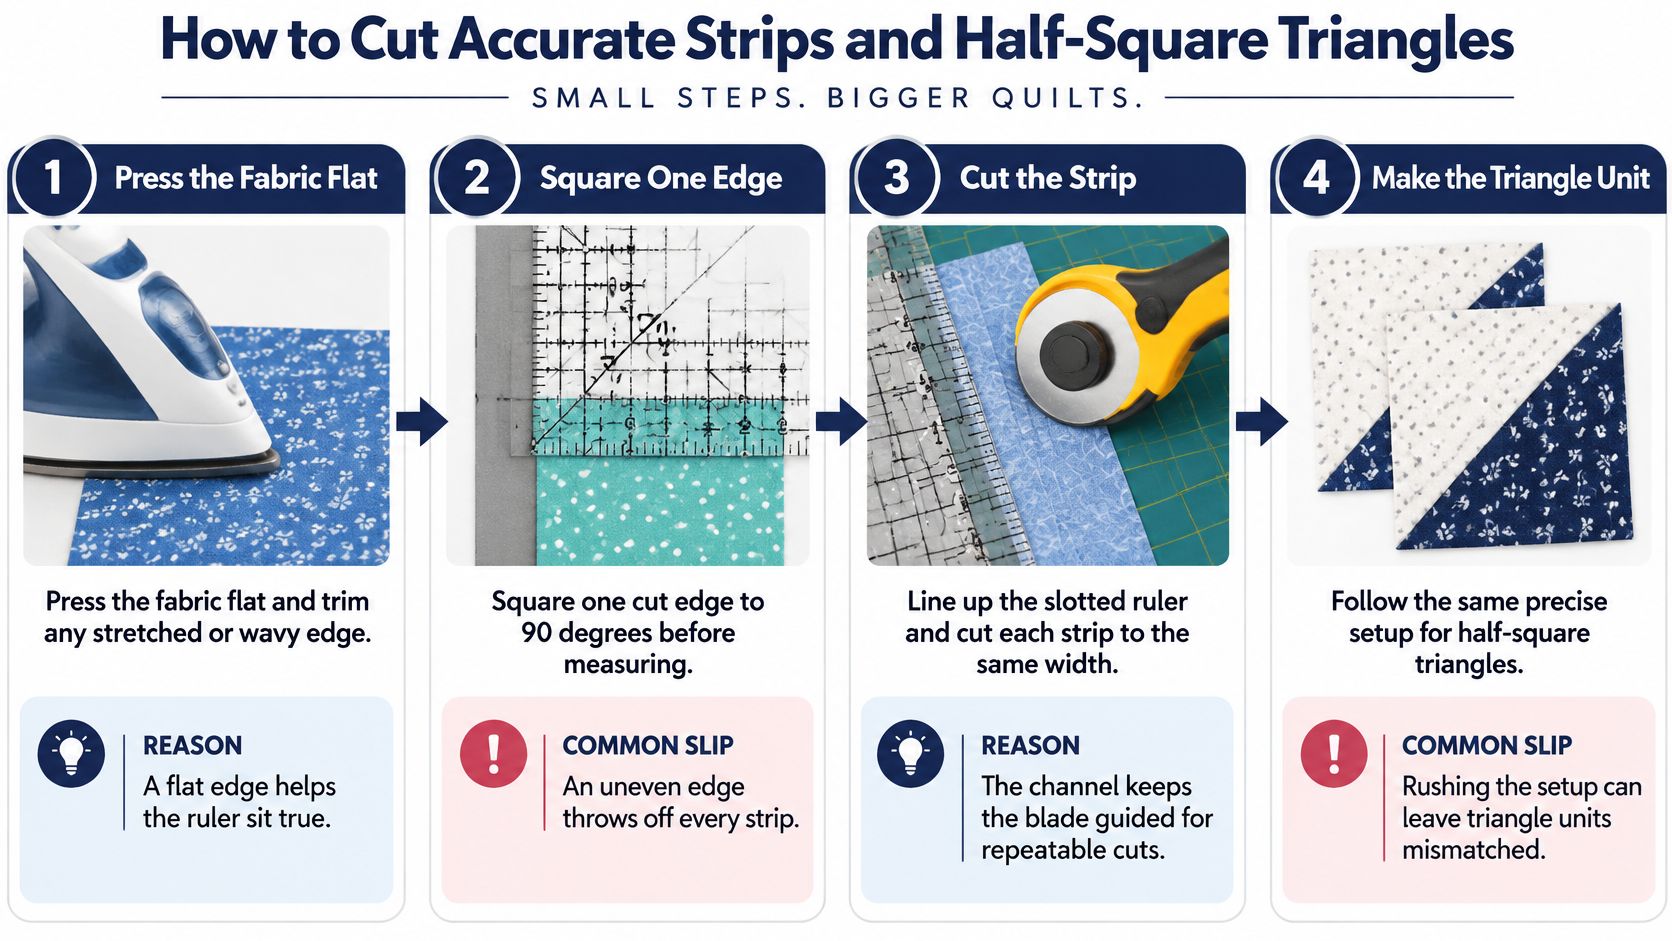
Prepare and align
- Press the fabric flat. Remove wrinkles and let the fabric settle before measuring. Trim a stretched or wavy edge instead of holding it straight beneath the ruler.
- Square a starting edge to 90 degrees. Use a square ruler or the slotted ruler's right-angle reference, not the mat's printed grid as your measuring authority. An angled starting edge can make matching-width cuts skewed.
- Align the correct ruler line with the squared edge. Check along the full visible length, not only at the corner nearest your hand. Use a straight reference, not a puckered selvage or printed motif.
- Seat the blade fully inside the selected slot. Trace the channel visually before exposing the blade, especially where printed lines intersect. Check that the cutter housing clears the acrylic and the blade reaches the fabric without force.
Anchor, cut, and verify
- Stabilize the ruler across its surface. Keep fingers away from the selected channel and place pressure where it prevents rocking or sliding. Keep the blade against the slot edge, not on top of the acrylic.
- Cut away from your body with controlled pressure. Use enough force for a clean cut, but don't compensate for a struggling blade by pressing harder. If you need to reposition your hand, stop the cutter and close its guard first.
- Check a test strip against the printed width. Measure both ends and the middle with the fabric relaxed. For a long batch, recheck the width before continuing.
- Prepare the half-square triangle pieces. For the table's 4-inch finished-unit example, cut 4-7/8-inch squares, then cut each square once diagonally. Handle the bias edges gently. The triangles become half-square triangle units after they're paired and sewn.
A sound first cut has straight edges, consistent width, no visible fabric shift, and no connected threads along its length. If any of those signs are missing, correct the setup before cutting the batch.
A guided blade repeats a mistake as neatly as it repeats a correct cut. Check the setup before continuing.
Keep the motion comfortable
Keep your wrist close to neutral and arrange the work so you don't have to reach across the table. With bulky flannel, cut fewer layers and use shorter, controlled passes when the ruler's instructions permit them. Don't saw back and forth through a slot.
If the position feels cramped, rearrange the work rather than twisting your wrist. Stop when fatigue makes your hand drag or your grip tighten.
A different handle shape may improve control, but it won't correct poor blade fit. Compare grip, blade size, and control in this rotary-cutter guide for quilting before replacing your cutter.
For a moving demonstration of the cutting routine, use the video below.
Fixing Wobbly Strips and Off-Size Pieces
Symptoms, causes and fixes for slotted ruler cutting
| Symptom | Likely cause | Fix |
|---|---|---|
| Strips measure narrow | Ruler shifted during the cut | Anchor at several points and keep the blade inside the slot. Quick setup adjustment; replace undersized pieces. |
| Strips measure wide | Blade not seated in the slot | Check blade seating, then cut a test strip. Quick adjustment; trim oversized pieces if usable. |
| Pieces come out skewed | Starting edge not squared | Square the cut edge to 90 degrees before measuring. Fresh reference edge needed. |
| Blade skips or drags | Dull blade or excessive pressure | Replace the blade and use moderate pressure. New blade may be needed. |
| Width drifts across a long batch | Cutter drift accumulates over repeated cuts | Recheck width after several cuts and adjust. Pause and reset the setup. |
| Crooked edges on flannel | Distorted fabric grain | Align to straight grain and selvage, and cut fewer layers. Repress and start from a sound edge. |
These are starting diagnoses, not guarantees. A narrow strip can also come from selecting the wrong channel, while a wide one may come from reading the wrong reference line.
Separate setup errors from tool problems
Make a test cut and compare it with the ruler's printed dimension. If it's consistently off, inspect blade seating, ruler orientation, fabric squareness, and the mat surface before cutting again.
Check the simplest explanation first. Confirm the selected slot, make sure loose threads aren't caught underneath, and flatten overlapping layers. A folded ridge can lift the ruler enough to change the way you hold the cutter.
For perspective, Linda's guide to acrylic quilting rulers gives a premium-ruler manufacturing benchmark of approximately ±0.001 inch across the ruler's length, but that describes the ruler, not guaranteed finished-piece accuracy.
Don't try to recover a narrow piece by stretching it to size. Set it aside for a smaller component or the remnants basket. An oversized piece may be trimmed, provided the grain and required dimensions remain usable.
Diagnose fabric separately
Flannel needs support, not stronger downward pressure. If the top layer looks straight but the bottom layer bows, reduce the stack and realign the fabric before continuing.
Likewise, a sharply cut block that becomes undersized after sewing may have a seam-allowance problem rather than a cutting problem. Check the unfinished unit against the pattern before trimming anything else.
Use the quilt-block squaring guide when the problem appears after assembly. Trimming should refine a sound block, not hide a construction error by removing its points.
Troubleshooting shortcut: If the error is consistent, inspect the reference and blade position. If it changes along the cut, look for movement, uneven support, or distorted fabric.
Maintain the cutting setup
- Clean acrylic gently: Use a soft cloth with mild soap and water, following the ruler manufacturer's care directions.
- Store rulers flat: Keep them supported and away from heat that could distort the acrylic.
- Watch for blade drag: Replace a struggling blade rather than compensating with extra force.
- Inspect the mat: Remove lint and check for grooves or damaged areas beneath the cutting path.
Choose Your First Slotted Ruler Size
If your regular job is cutting matching strip sets, binding stock, or repeated shapes, a slotted ruler can reduce the need to reposition a straightedge. For one-off cuts, mixed dimensions, and general measuring, a standard acrylic ruler is often enough.
Start with the widths you cut most often, then choose a ruler long enough for your usual fabric arrangement that you can still anchor it comfortably.
Slotted and standard rulers compared for buying decisions
| Option | Best for | Watch for |
|---|---|---|
| Slotted quilting ruler, metric 30 × 15 cm | Metric cutting and repeat strips | Check compatibility with 28 mm and 45 mm cutters |
| Etsy-listed premium slotted ruler | Repeat strip sets | Confirm slot spacing and cutter fit |
| Slotted quilting ruler, inch-calibrated | Inch-based strips and borders | Half-inch slots don't directly cover every odd width |
| Standard acrylic ruler | One-off straight cuts and general measuring | Requires fresh alignment for each cut |
The Etsy slotted-rulers marketplace included a Creative Grids Stripology XL listed at $89.99 in 2026. Treat that as a listing reference, not a universal price or a guarantee of current availability.
Test whether the slot solves your problem
Compare the two tools on a cut you make often. Use the same pressed fabric and check the finished pieces for consistent width, straight edges, and shifting. Notice whether selecting slots feels easier than realigning a straightedge, and whether the results are usable without recutting.
If a sharp blade, secure grip, and one checked test cut give you the accuracy you need, a standard ruler may be sufficient. If repeated realignment is the sticking point, a slotted model may suit your workflow better.
Choose a size you can control
Match the ruler's graduations to your patterns. A compact metric model suits metric work, while mixed inch-and-metric projects call for careful conversion before cutting.
A larger ruler covers more fabric in one setup but takes more table space and can be harder to anchor comfortably. Compare the sizes and markings in this guide to acrylic quilting rulers, then choose the smallest setup that handles your regular cuts.
The Fabric Company offers precuts, quilting cotton, cutting tools, 108-inch backings, and batting for projects from first strips to finished quilts. Shop The Fabric Company, visit the Springfield, Tennessee showroom, or explore the latest Precuts collection. Join The Weekly Thread for quilting tips and 10% off your first order.